Upgrading to a new Samsung Galaxy phone is exciting, but the thought of moving all your precious data – photos, contacts, messages, apps, and settings – can often feel daunting. Fortunately, Samsung and Android offer several robust wireless transfer methods that make this process incredibly simple and efficient, allowing you to get your new phone set up exactly like your old one without the hassle of cables.
Gone are the days of manually copying files or losing important information. Modern Samsung devices come equipped with powerful tools like Samsung Smart Switch, and leverage cloud services such as Google Drive and Samsung Cloud, ensuring a smooth transition. These tools are designed to handle everything from your personalized home screen layout to your detailed call logs, making your new phone feel instantly familiar.
This guide will walk you through the most effective wireless methods to transfer your data, ensuring a seamless migration from your old Samsung Galaxy to your brand-new one.
Method 1: Using Samsung Smart Switch (Recommended for All Data)
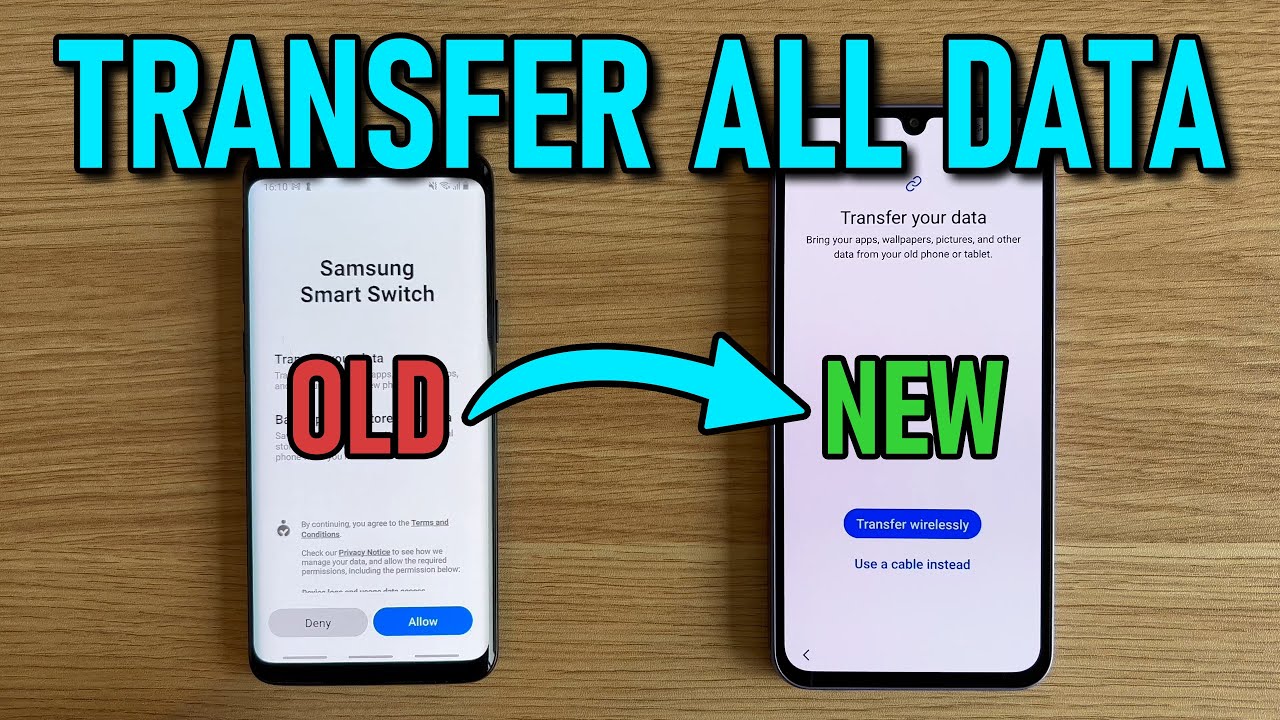
Samsung Smart Switch is the official and most comprehensive tool for transferring data between Samsung Galaxy devices, and it excels at wireless transfers. It allows you to move almost everything, including contacts, messages, photos, videos, apps, settings, call history, and even your home screen layout.
Before You Start:
- Charge Both Phones: Ensure both your old and new Samsung phones are charged to at least 50% to prevent interruption.
- Install Smart Switch: The Smart Switch app is usually pre-installed on newer Samsung Galaxy devices. If not, download it from the Galaxy Store or Google Play Store on both phones.
- Proximity: Keep both phones close to each other (within 4 inches is ideal).
- Wi-Fi Connection: While Smart Switch can often create its own direct wireless connection (Wi-Fi Direct), having both devices connected to the same strong Wi-Fi network can improve stability for large transfers.
Step-by-Step Wireless Transfer with Smart Switch:
- Launch Smart Switch on Both Phones:
- On your new Samsung Galaxy phone: During the initial setup process, you will typically be prompted to “Bring data from old device” or “Use Smart Switch.” Follow the on-screen instructions. If you’ve already set up your new phone, go to Settings > Accounts and backup > Bring data from old device (or search for “Smart Switch” in settings).
- On your old Samsung Galaxy phone: Open the Smart Switch app. If it’s not pre-installed, download it.
- Select Transfer Roles:
- On your new phone, tap “Receive data.”
- On your old phone, tap “Send data.”
- Choose Wireless Connection:
- On your new phone, select “Galaxy/Android” as the old phone type, then tap “Wireless.”
- On your old phone, tap “Wireless” when prompted for the connection method.
- Connect the Devices:
- A prompt will appear on your old phone to connect to the new device. Tap “Allow.”
- The phones will establish a direct wireless connection.
- Select Data to Transfer:
- After a quick scan, your new phone will display a list of transferable content from your old phone. You can choose:
- “Everything”: Transfers all data.
- “Just accounts, calls, contacts, and messages”: For a quicker, essential transfer.
- “Custom”: Allows you to manually select specific categories (e.g., only photos, certain apps, specific settings).
- Select your desired data.
- After a quick scan, your new phone will display a list of transferable content from your old phone. You can choose:
- Start the Transfer:
- Tap “Transfer” (or “Next” depending on your One UI version) at the bottom right of the screen on your new phone.
- The transfer process will begin. This can take anywhere from a few minutes to several hours, depending on the amount of data.
- Keep phones close and on screen: It’s a good idea to tap “Keep screen on” on both devices to prevent the connection from being interrupted by screen timeouts.
- Complete the Transfer:
- Once the transfer is complete, your new phone will confirm that the data was successfully sent. Tap “Next” and then “Done.”
- On your old phone, tap “Done.”
- Your new Samsung Galaxy phone now has all your migrated data! You may need to log into certain apps (like banking apps) manually due to security protocols.
Method 2: Utilizing Google Backup and Restore (Essential Data)
Your Google Account provides a robust, cloud-based backup service for essential phone data, making it easy to restore to any new Android phone, including a Samsung Galaxy, without a direct phone-to-phone connection. This method relies on data being backed up to Google Drive.
Before You Start:
- Google Account Signed In: Ensure your old Samsung phone is signed into your primary Google Account.
- Enable Google Backup: Verify that Google backup is enabled and up-to-date on your old phone.
- Wi-Fi Connection: Both phones need a stable Wi-Fi connection.
Step-by-Step Google Backup & Restore:
- Backup Your Old Samsung to Google Drive:
- On your old Samsung Galaxy phone, go to Settings > Accounts and backup > Google Drive (or Backup data under Google Drive).
- Ensure “Back up to Google Drive” is toggled ON.
- Tap “Back up now” to initiate a manual backup and ensure all your latest data is saved. This includes app data, call history, contacts, device settings, messages, and Google Photos.
- Wait for the backup to complete.
- Set Up Your New Samsung Galaxy Phone:
- Power on your new Samsung Galaxy phone.
- Follow the initial setup prompts. When you reach the “Copy apps & data” screen, select “Next.”
- Choose “Can’t use old device?” or “A cloud backup.”
- Sign in with the same Google Account you used to back up your old phone.
- Restore Data from Google Backup:
- Your new phone will detect available backups associated with your Google Account. Select the most recent backup.
- You’ll be given options to choose what data to restore (e.g., apps, call history, device settings, SMS messages).
- Tap “Restore” (or “Next,” then “Restore”) to begin the process.
- The phone will download and install your apps, restore settings, and populate contacts/messages. Photos and videos synced with Google Photos will automatically appear in the Google Photos app.
Benefits of Google Backup:
- Cloud-Based: Data is stored in the cloud, accessible anywhere with an internet connection.
- Cross-Device Compatibility: Works for transferring data to any new Android phone, not just Samsung.
- Automatic Backups: Once set up, backups occur automatically when connected to Wi-Fi, idle, and charging.
Method 3: Leveraging Samsung Cloud (Samsung-Specific Data)
Samsung Cloud offers another wireless backup solution, specifically for data generated by Samsung’s own apps and features (e.g., Samsung Notes, Samsung Health data, Calendar, Contacts synced to Samsung Account, Home screen layout for Samsung phones).
Before You Start:
- Samsung Account: Ensure both phones are signed into the same Samsung Account.
- Enable Samsung Cloud Sync/Backup: Verify syncing and backup are enabled on your old phone.
- Wi-Fi Connection: A stable Wi-Fi connection is recommended.
Step-by-Step Samsung Cloud Backup & Restore:
- Backup Your Old Samsung to Samsung Cloud:
- On your old Samsung Galaxy phone, go to Settings > Accounts and backup > Samsung Cloud.
- Tap “Back up data.”
- Select the items you wish to back up (e.g., Phone, Messages, Contacts, Calendar, Clock, Home screen, Apps, Settings, Voice Recorder).
- Tap “Back up now.” Wait for the process to complete.
- You can also ensure continuous syncing for certain data (like contacts, calendar, Samsung Notes) by tapping “Sync and auto back up settings” and toggling on the desired categories.
- Restore Data to Your New Samsung Galaxy Phone:
- On your new Samsung Galaxy phone, during initial setup, when prompted to restore data, you can choose the option for Samsung Cloud. Sign in with your Samsung Account.
- If you’ve already set up your new phone, go to Settings > Accounts and backup > Samsung Cloud.
- Tap “Restore data.”
- Select the most recent backup from your old device.
- Choose the types of data you want to restore.
- Tap “Restore” (or “Sync”) to begin downloading your data.
Benefits of Samsung Cloud:
- Deep Samsung Integration: Ideal for transferring Samsung-specific data and settings that Google Backup might not cover (like custom home screen layouts from One UI).
- Convenience for Samsung Ecosystem Users: Seamless integration if you primarily use Samsung services and apps.
Method 4: Individual Wireless Transfers (For Specific Files)
For smaller, specific data transfers like a few photos, videos, or contacts, you can use built-in Android sharing features.
- Share Using Nearby Share (Android’s AirDrop):
- Nearby Share allows fast, direct file transfer between Android devices (and some Chromebooks) without an internet connection.
- On both phones: Ensure Bluetooth and Location are ON.
- On old phone: Select the photos, videos, or files you want to share from your Gallery or Files app. Tap the “Share” icon.
- Tap “Nearby Share.”
- Your new phone should appear in the list of nearby devices. Tap its name.
- On new phone: Accept the incoming files.
- Share Contacts via Bluetooth:
- On your old phone, open the Contacts app.
- Select the contact(s) you wish to transfer.
- Tap “Share.”
- Choose “Bluetooth.”
- Select your new phone from the list of paired or available Bluetooth devices.
- On your new phone, accept the incoming contact file (usually a .vcf file).
Conclusion
Transferring data wirelessly from your old Samsung Galaxy to your new one is a straightforward process, thanks to well-integrated tools and cloud services. For the most comprehensive transfer, Samsung Smart Switch is your best bet, moving nearly everything over with minimal effort. For essential data synced to the cloud, Google Backup provides universal Android compatibility, while Samsung Cloud offers deeper integration for Samsung-specific content. By choosing the method that aligns with your needs, you can quickly get your new Samsung Galaxy phone ready for use, feeling just like home from the moment you power it on.
FAQ Section
Q1: What is the fastest way to transfer all data from an old Samsung to a new one wirelessly?
The fastest and most comprehensive way to transfer all data wirelessly from an old Samsung to a new one is by using Samsung Smart Switch. It utilizes Wi-Fi Direct for high-speed local transfer of contacts, messages, photos, videos, apps, settings, and more.
Q2: Can I transfer app data (like game progress) wirelessly with Smart Switch?
Samsung Smart Switch attempts to transfer app data, including settings and some game progress, especially for apps installed from the Google Play Store. However, whether specific app data or game progress transfers successfully also depends on how the individual app is designed (e.g., if the app itself stores data on a cloud server). For critical game progress, always check if the game has its own in-app cloud save feature.
Q3: Do I need a Wi-Fi connection for Samsung Smart Switch’s wireless transfer?
While Samsung Smart Switch can create its own direct wireless connection (Wi-Fi Direct) between the two phones, having both devices connected to the same stable Wi-Fi network can often result in a faster and more reliable transfer, especially for very large amounts of data.
Q4: What data is backed up to Google Drive from my Samsung phone?
Google Drive backup (via Google One) typically backs up essential phone data like app data, call history, contacts, device settings, SMS messages, and photos/videos (to Google Photos). This backup is associated with your Google Account and can be restored to any Android device during its initial setup.
Q5: Can I transfer data from a non-Samsung Android phone to a new Samsung Galaxy wirelessly?
Yes. Samsung Smart Switch is designed to transfer data from other Android devices (including non-Samsung phones running Android 4.3 or higher) to a new Samsung Galaxy phone wirelessly. The steps are largely similar to transferring between two Samsung phones, though the exact types of data transferable might vary slightly depending on the old phone’s brand and Android version.