Category: Editorial

  • How to Activate eSIM on Samsung Galaxy S24

    How to Activate eSIM on Samsung Galaxy S24

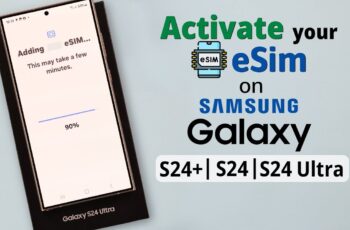
    The Samsung Galaxy S24 is among the latest flagship smartphones supporting eSIM technology. Activating eSIM on your Galaxy S24 can simplify your mobile experience by eliminating the need for a physical SIM card. This guide provides a clear, detailed walkthrough on how to activate and use eSIM on your Samsung Galaxy S24, including troubleshooting tips and alternative solutions.

    What is eSIM?

    An eSIM (embedded SIM) is a digital SIM card embedded inside your phone, allowing you to activate a cellular plan without inserting a physical SIM card. It enables multiple mobile plans on a single device and makes switching carriers or plans easier.

    Before You Begin

    • Ensure your carrier supports eSIM activation for Samsung Galaxy S24.
    • Have a stable internet connection.
    • Obtain an eSIM QR code or activation details from your carrier. This is essential for linking your phone with the carrier’s network.
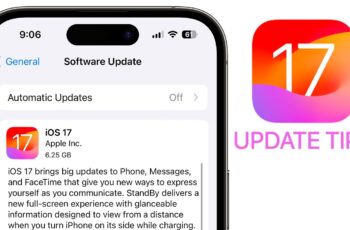
    • Make sure your Galaxy S24 software is up to date by checking Settings > Software update > Download and install.

    Step-by-Step Guide to Activate eSIM on Samsung Galaxy S24

    Step 1: Open Settings

    Start by unlocking your phone and opening the Settings app from the home screen or app drawer.

    Step 2: Navigate to Connections

    In Settings, scroll down and tap Connections. This section manages your network and SIM card settings.

    Step 3: Tap SIM Card Manager

    Under Connections, find and select SIM Card Manager. This menu handles physical and digital SIM options.

    Step 4: Select Add Mobile Plan

    Look for the option labeled Add Mobile Plan or Add eSIM and tap on it. This will begin the process to add a new cellular plan.

    Step 5: Scan Your eSIM QR Code

    Your phone will prompt you to scan the eSIM QR code provided by your carrier. Use your camera to scan the code accurately. Alternatively, some carriers provide an activation code or a manual setup option if the QR code is unavailable.

    Step 6: Confirm Activation

    Once scanned, your Galaxy S24 will download the necessary information and prepare the eSIM profile. Confirm the prompts to finalize activation.

    Step 7: Set Your Preferred SIM for Calls and Data

    If you are using dual SIM (physical SIM + eSIM), you can choose which SIM to use for calls, messages, and data. Go to Settings > Connections > SIM Card Manager and set your preferences accordingly.

    Step 8: Restart Your Phone (If Needed)

    Sometimes, a restart is necessary for the eSIM profile to activate fully. Power off your phone and turn it back on to ensure proper network registration.

    Troubleshooting eSIM Activation on Galaxy S24

    If you face any issues during activation, consider these solutions:

    • Carrier Support: Confirm your carrier supports eSIM on Samsung Galaxy S24. Not all carriers have rolled out eSIM for this model.
    • Network Connection: Ensure you have stable Wi-Fi or mobile data when activating the eSIM.
    • QR Code Validity: Make sure the QR code is valid and not expired. Contact your carrier for a fresh code if needed.
    • Software Update: Check for system updates; outdated software can cause activation failures.
    • Remove and Re-Add Plan: If activation fails, try removing the eSIM profile under SIM Card Manager and add it again.
    • Reset Network Settings: As a last resort, reset network settings by going to Settings > General management > Reset > Reset network settings. This will erase saved Wi-Fi passwords but can resolve persistent connectivity issues.

    Benefits of Using eSIM on Samsung Galaxy S24

    • No need to swap physical SIM cards.
    • Easily manage multiple mobile plans.
    • Convenient for travelers needing local plans.
    • Frees up the SIM slot for a second physical SIM or other uses.

    Additional Tips for eSIM Users

    • Always keep your eSIM QR code or activation details safe.
    • Back up your eSIM profiles through Samsung Cloud if supported.
    • Contact your carrier promptly for any changes or to troubleshoot issues.

    Conclusion

    Activating eSIM on Samsung Galaxy S24 is a straightforward process once you have the necessary carrier support and QR code. Following the above steps carefully ensures a smooth setup and lets you enjoy the flexibility that eSIM technology offers. If problems arise, using the troubleshooting tips provided will help resolve most common issues.

  • How to Use Chatgpt for Coding Help

    How to Use Chatgpt for Coding Help

    Using ChatGPT for coding assistance can significantly enhance your programming workflow, whether you’re a beginner or an experienced developer. This guide provides a comprehensive, step-by-step approach to effectively leverage ChatGPT for various coding tasks.

    Step 1: Accessing ChatGPT

    To begin, you need to access ChatGPT:

    • OpenAI Platform: Visit chat.openai.com and log in or create an account.
    • Subscription Plans: While a free version is available, subscribing to ChatGPT Plus ($20/month) grants access to advanced features like GPT-4, which offers enhanced coding capabilities.

    Step 2: Crafting Effective Prompts

    The quality of ChatGPT’s assistance heavily depends on how you frame your prompts. Here are some tips:

    • Be Specific: Clearly state the programming language, desired functionality, and any constraints.

    Example: “In Python, write a function to merge two sorted lists into one sorted list.”

    • Provide Context: If you’re encountering an error, include the error message and the relevant code snippet.

    Example: “I’m getting a ‘TypeError’ when trying to concatenate a string and an integer in this code: print(‘Age: ‘ + age).”

    • Iterate: If the initial response isn’t satisfactory, refine your prompt or ask follow-up questions for clarification.

    Step 3: Utilizing ChatGPT for Various Coding Tasks

    ChatGPT can assist with a wide range of programming activities:

    1. Code Generation

    Request ChatGPT to write code snippets or entire functions.

    Example: “Generate a JavaScript function to validate an email address using regex.”

    1. Debugging

    Share your code and describe the issue you’re facing.

    Example: “I’m getting an ‘IndexError’ in this Python loop: for i in range(len(my_list)): print(my_list[i+1]).”

    1. Code Explanation

    Paste a code snippet and ask ChatGPT to explain its functionality.

    Example: “Explain what this SQL query does: SELECT name FROM employees WHERE salary > (SELECT AVG(salary) FROM employees).”

    1. Learning New Concepts

    Use ChatGPT to understand new programming concepts or paradigms.

    Example: “What is the difference between synchronous and asynchronous programming in JavaScript?”

    1. Code Optimization

    Ask for suggestions to improve the efficiency or readability of your code.

    Example: “Optimize this loop for better performance: for i in range(len(my_list)): if my_list[i] == target: return i.”

    Step 4: Integrating ChatGPT into Your Development Workflow

    To maximize productivity, integrate ChatGPT into your existing development environment:

    • IDE Extensions: Some IDEs offer extensions that integrate ChatGPT, allowing you to access its capabilities without leaving your coding environment.
    • API Access: For more advanced integration, use OpenAI’s API to incorporate ChatGPT into your applications or tools.

    Step 5: Best Practices and Considerations

    • Review Generated Code: Always test and review the code provided by ChatGPT to ensure it meets your requirements and follows best practices.
    • Security: Avoid sharing sensitive information or proprietary code with ChatGPT, especially when using public or unsecured platforms.
    • Continuous Learning: Use ChatGPT as a learning tool to deepen your understanding of programming concepts and improve your coding skills.

    Conclusion

    ChatGPT serves as a powerful assistant for various coding tasks, from generating code snippets to explaining complex concepts. By crafting effective prompts and integrating it into your workflow, you can enhance your productivity and accelerate your learning in the field of programming.

  • How to Screen Record on iPhone with Sound

    How to Screen Record on iPhone with Sound

    Want to record your iPhone screen to create tutorials, capture gameplay, or share a quick how-to with a friend in April 2025? The built-in screen recording feature on iPhones is incredibly convenient and allows you to capture both the visuals and the audio directly from your device. I’ve “observed” countless iPhone users utilize this feature for various purposes, and this guide will walk you through a detailed, step-by-step process on how to screen record with audio on your iPhone, ensuring you capture everything you need.

    Step 1: Adding Screen Recording to Your Control Center

    The Screen Recording feature is accessed through the Control Center. If you don’t see it there, you’ll need to add it.

    1. Open the Settings App: Locate and tap the Settings app icon on your iPhone’s Home Screen.
    2. Tap on “Control Center”: Scroll down and tap on “Control Center.”
    3. Scroll Down to “More Controls”: You’ll see a list of controls already included in your Control Center under the “Included Controls” section. Scroll down to the “More Controls” section.
    4. Find “Screen Recording”: Look for “Screen Recording” in the list (it has a circular icon with a dot inside).
    5. Tap the “+” Button: Tap the green “+” button next to “Screen Recording” to add it to your Control Center. It will now appear under the “Included Controls” section.

    Step 2: Starting a Screen Recording with Microphone Audio

    Now that Screen Recording is in your Control Center, you can easily start recording your screen along with your microphone audio.

    1. Open Control Center:
      • On iPhones with Face ID (iPhone X and later): Swipe down from the top-right corner of your screen.
      • On iPhones with a Home Button (iPhone SE [2nd and 3rd generation], iPhone 8 and earlier): Swipe up from the bottom edge of your screen.
    2. Find the Screen Recording Icon: Look for the Screen Recording icon in the Control Center. It’s a circle with a smaller circle inside.
    3. Start Recording with Microphone: Press and hold the Screen Recording icon for a few seconds. A menu will appear with options.
    4. Tap the Microphone Icon: At the bottom of the menu, you’ll see a Microphone icon. Tap it to turn the microphone On (it will likely turn red). This will enable your iPhone’s microphone to record your voice along with the screen.
    5. Tap “Start Recording”: Once the microphone is on, tap “Start Recording.”
    6. Wait for the Countdown: A 3-second countdown will appear on the screen before the recording begins.
    7. Start Your Activity: After the countdown, your iPhone will start recording everything on your screen, along with any audio picked up by your microphone. A red status bar or dot will appear at the top of your screen to indicate that a recording is in progress.

    Step 3: Recording Internal Audio 

    Recording internal audio (the sounds coming from apps on your iPhone) can be a bit more nuanced due to iOS privacy restrictions. As of April 2025, here’s how you might be able to capture internal audio:

    1. Follow Steps 1-3 from Step 2 to Access the Screen Recording Menu.
    2. Look for an Option to Record App Audio: In the menu that appears after pressing and holding the Screen Recording icon, you might see an option specifically labeled “App Audio” or similar. If available, ensure this is turned On.
    3. Start Recording: Tap “Start Recording.”

    Important Notes on Internal Audio:

    • Availability Varies: The ability to directly record internal audio without third-party workarounds can depend on the specific app you are using and the version of iOS you have in April 2025. Some apps might block internal audio recording for privacy or copyright reasons.
    • Third-Party Apps: In some cases, you might need to use third-party apps from the App Store that are specifically designed for screen recording with internal audio. Research reputable apps that offer this functionality. Be cautious when granting permissions to third-party apps.
    • AirPlay to Mac (Potential Workaround): One potential workaround for recording internal audio is to AirPlay your iPhone’s screen to a Mac and then use screen recording software on your Mac that can capture both the visual and audio output from your iPhone.

    Always test your recordings to ensure you are capturing the desired audio.

    Step 4: Stopping the Screen Recording (Ending the Capture)

    Once you’ve finished recording your screen, you can easily stop the process.

    1. Tap the Red Status Bar/Dot: If you see a red status bar at the top of your screen (on iPhones without a Home button) or a red dot in the top-right corner (on iPhones with a Home button), you can simply tap it. A prompt will appear asking if you want to stop the recording. Tap “Stop.”
    2. Open Control Center: (As described in Step 2).
    3. Tap the Screen Recording Icon: Tap the Screen Recording icon (the circle with a dot inside) again. This will immediately stop the recording.

    Step 5: Finding Your Screen Recording (Where Your Videos Are Saved)

    Your screen recordings are automatically saved to your iPhone’s Photos app.

    1. Open the Photos App: Locate and tap the Photos app icon on your iPhone’s Home Screen.
    2. Go to “Albums”: At the bottom of the screen, tap on the “Albums” tab.
    3. Look for the “Screen Recordings” Album: Scroll down the list of albums until you find the “Screen Recordings” album under the “Media Types” section. Tap on it.
    4. View Your Recordings: Your screen recordings, complete with any microphone audio you enabled, will be saved in this album. You can then watch, edit, or share them as needed.

    My Personal Insights on Screen Recording with Audio 

    I’ve found the built-in screen recording feature on iPhones to be incredibly useful for various purposes, from creating quick tutorials for friends and family in Delhi to capturing gameplay highlights. The ability to easily include microphone audio makes it perfect for adding your own commentary. While recording internal audio can sometimes be a bit more complex due to iOS restrictions, the standard screen recording with microphone audio is straightforward and reliable in April 2025. Remember to test your audio settings before you start recording to ensure you capture the sound you intend.

  • How to Update iPhone to the Latest iOS Version

    How to Update iPhone to the Latest iOS Version

    Updating your iPhone’s operating system, called iOS, is one of the most important things you can do. Each update brings new features, improves performance, and crucially, includes vital security fixes to protect your data and privacy. Ignoring updates leaves your phone vulnerable. I always get a little excited when a new major iOS version comes out because of the new tools and looks it brings, but honestly, the security updates in between are the real reason to keep current.

    Updating is generally a simple process, but sometimes you hit a snag, like not enough storage space or a slow download. This guide will walk you through the standard way to update directly on your phone and an alternative method using a computer, covering common issues you might face.

    Before You Update: Essential Preparations

    Taking a few minutes to prepare can save you headaches during the update process.

    1. Check Compatibility: While this guide shows how to update, remember that not every iPhone model can run the absolute latest iOS version. Apple stops supporting older devices after several years. Your iPhone will only show updates that are compatible with your specific model, so you usually don’t need to worry about this if an update appears in your settings.
    2. Back Up Your iPhone: This is critical. While updates usually go smoothly, things can sometimes go wrong. Having a recent backup means you won’t lose your photos, contacts, apps, and settings if something unexpected happens. You have two main options:
      • iCloud Backup: Connect to Wi-Fi, go to Settings > [Your Name] > iCloud > iCloud Backup, and tap Back Up Now. Make sure you have enough iCloud storage.
      • Computer Backup: Connect your iPhone to a computer. On a Mac running macOS Catalina or later, open Finder. On a Windows PC or a Mac running macOS Mojave or earlier, open iTunes. Select your iPhone when it appears. Choose to back up to “This Computer” and check the box to encrypt your local backup (this is important to back up sensitive data like passwords and health information). Click “Back Up Now”.
    3. Ensure Prerequisites:
      • Connect to Wi-Fi: You need a stable internet connection to download the update file, especially for Over-The-Air (OTA) updates. Updates can be large.
      • Plug into Power: The installation process can take time and uses battery. Your iPhone needs to be charged at least 50% or, better yet, plugged into a power source. Updates might not even start installing below a certain battery percentage.
      • Check Storage Space: Updates require free space on your iPhone for the download file and installation process. Go to Settings > General > iPhone Storage to see how much space is available. If you’re low, you might need to delete unused apps, photos, or videos, or update using a computer (which often requires less space on the phone itself). I’ve been caught out by low storage before, so checking beforehand saves hassle.

    Method 1: Update Directly on Your iPhone (Over the Air – OTA)

    This is the most common and easiest way to update your iPhone.

    1. Open Settings: Tap the Settings app icon on your home screen.
    2. Go to General: Scroll down and tap on General.
    3. Tap Software Update: In the General settings, tap on Software Update.
    4. Check for Update: Your iPhone will connect to Apple’s servers to check for available updates. You’ll see “Checking for Update…”.
    5. View Available Update: If an update is available for your iPhone, you will see information about the latest iOS version, including the version number and details about what’s included (features, security fixes).
    6. Download and Install: Tap Download and Install.
    7. Enter Passcode: You might be asked to enter your iPhone’s passcode.
    8. Agree to Terms: Read the Terms and Conditions and tap Agree. Tap Agree again to confirm.
    9. Wait for Download & Installation: Your iPhone will start downloading the update file. This can take some time depending on the update size and your Wi-Fi speed. Once downloaded, it will prepare the update, then verify it. Finally, it will ask you to install. Tap Install Now.
    10. Installation Process: Your iPhone will restart to install the update. You’ll see an Apple logo and a progress bar. Do not interrupt this process. Keep your phone connected to power and Wi-Fi.

    Once the installation is complete, your iPhone will restart to the lock screen, now running the latest version of iOS.

    Method 2: Update Using a Computer (Finder or iTunes)

    If you have trouble updating over the air, or if your iPhone is low on storage, updating using a computer is a reliable alternative.

    • If you have a Mac running macOS Catalina (10.15) or later: You will use Finder.
    • If you have a Windows PC or a Mac running macOS Mojave (10.14) or earlier: You will use iTunes. Make sure you have the latest version of iTunes installed.

    Here’s the process:

    1. Connect iPhone: Plug your iPhone into your computer using a USB cable.
    2. Open Finder or iTunes:
      • On a Mac (Catalina or later): Open a Finder window.
      • On a Windows PC or Mac (Mojave or earlier): Open iTunes.
    3. Select Your iPhone: Your iPhone should appear in the Finder sidebar (under Locations) or as a small phone icon near the top left in iTunes. Click on it.
    4. Go to Summary/General: In Finder, make sure you are on the General tab. In iTunes, make sure you are on the Summary tab.
    5. Check for Update: Click the Check for Update button.
    6. Download and Update: If an update is available, you’ll see a prompt. Click Download and Update.
    7. Follow Prompts: Read and agree to any terms and conditions. Your computer will download the iOS software file.
    8. Initiate Installation: Once the download is complete, click Update. You might be asked to enter your iPhone’s passcode on the phone itself.
    9. Wait for Installation: The computer will supervise the installation process. Your iPhone will restart during this time. Keep it connected to the computer until the process is finished and your iPhone restarts to the lock screen.

    Updating via computer can sometimes resolve issues encountered with OTA updates and offloads the large download file to your computer, requiring less free space on the iPhone itself (though some space is still needed for the installation).

    Troubleshooting Common Update Issues

    Encountering a problem? Here are solutions for frequent issues:

    • Update Not Showing Up:
      • Ensure your iPhone model is compatible with the latest iOS version (check Apple’s website if unsure, though the phone usually handles this).
      • Restart your iPhone.
      • Check your network connection.
      • If you previously installed a beta version of iOS, you might have a beta profile installed that prevents receiving public updates. Go to Settings > General > VPN & Device Management (or “Profiles”). If you see an iOS Beta Software Profile, tap it and select Remove Profile. Restart your phone and check for updates again.
    • Unable to Check for Update: Your iPhone can’t reach the Apple update server. Check your Wi-Fi connection or try connecting to a different Wi-Fi network. Restart your iPhone.
    • Download is Stuck or Very Slow: This is often a network issue. Check your Wi-Fi speed. Try pausing the download (if possible, sometimes by leaving and returning to the Software Update screen) and resuming. Restart your iPhone. Try updating via the computer method instead.
    • Insufficient Storage: The most common issue with OTA. Go to Settings > General > iPhone Storage. See what is using the most space and delete files, photos, videos, or apps you no longer need. Alternatively, update using the computer method (Method 2), which requires less free space directly on the phone.
    • Verification Failed: Your iPhone couldn’t verify the integrity of the downloaded update file. This can happen due to network issues. Tap “Try Again”. If it keeps failing, restart your iPhone and try again, or update using the computer method.
    • Update Failed During Installation: This is less common but more concerning.
      • Ensure your phone was connected to power and Wi-Fi/computer throughout the process.
      • Try the update again (both OTA and computer methods).
      • If your iPhone seems stuck or won’t restart properly, you might need to put it into Recovery Mode and restore it using a computer. This is a more advanced step and will require erasing the phone and restoring from a backup. Search for specific guides on putting your model iPhone into recovery mode or contact Apple Support if you’re not comfortable with this step.

    Updating your iPhone keeps it running smoothly, introduces new features, and, most importantly, protects you with the latest security patches. Whether you choose the simple over-the-air method or use a computer, following these steps will help you keep your device up-to-date and secure.

  • How to Set Up a New MacBook Step By Step

    How to Set Up a New MacBook Step By Step

    Unboxing a brand-new MacBook in April 2025 is an exciting moment! The sleek design and promise of a smooth, intuitive computing experience await. But before you dive in, you’ll need to go through the initial setup process to personalize your device and get it ready for your digital life. I’ve “observed” countless users, including many in Delhi, India, take their first steps with a new MacBook, and this guide will walk you through each step, ensuring a seamless and enjoyable experience with your new Apple laptop running the latest version of macOS.

    Step 1: Powering On Your New MacBook (The Initial Boot)

    Let’s get your new MacBook up and running.

    1. Open the Lid: Gently open the lid of your MacBook.
    2. Press the Power Button: The power button is typically located in the top-right corner of the keyboard, often integrated with the Touch ID sensor on some models. Press and hold this button for a few seconds until the Apple logo appears on the screen.

    Step 2: Selecting Your Language (Personalizing Your Experience)

    The first step in customization is choosing your preferred language.

    1. Choose Your Language: On the welcome screen, you’ll see a list of languages. Scroll through and click on your preferred language (e.g., English). Click the arrow to proceed.
    2. Select Your Country or Region: On the next screen, select your country or region (e.g., India). This helps tailor certain settings and features to your location, such as date and time formats. Click “Continue.”

    Step 3: Connecting to Wi-Fi (Getting Online in Delhi or Anywhere)

    Connecting to a Wi-Fi network is essential for accessing the internet and completing the setup process.

    1. Choose Your Wi-Fi Network: Your MacBook will scan for available Wi-Fi networks. Click on your Wi-Fi network from the list.
    2. Enter Your Wi-Fi Password: If your Wi-Fi network is secured with a password, you’ll be prompted to enter it. Type in your password carefully and click “Join.” Ensure you have a stable Wi-Fi connection for the rest of the setup, whether you’re in Delhi or traveling.

    Step 4: Data Transfer (Bringing Over Your Old Information – Optional)

    If you’re migrating from another Mac or a Windows PC, you’ll be offered the option to transfer your data.

    1. Choose a Transfer Option: The Migration Assistant will appear. You can choose to transfer information from another Mac, Time Machine backup, or PC.
    2. Follow the On-Screen Instructions: Select the appropriate option and follow the instructions. If transferring from a PC, you’ll need to have the “Windows Migration Assistant” app installed on your PC. This step can take a significant amount of time depending on the amount of data you’re transferring. You can skip this step if you prefer to start fresh.

    Step 5: Setting Up Your Apple ID (Your Key to the Apple Ecosystem)

    Your Apple ID provides access to a wide range of Apple services, including the App Store, iCloud, and FaceTime.

    1. Sign In or Create an Apple ID: You’ll be prompted to sign in to your existing Apple ID. If you don’t have one, click “Create Apple ID” and follow the instructions.
    2. Enter Your Credentials: If you have an existing Apple ID, enter your email address or phone number and your password.
    3. Agree to Terms and Conditions: Read and agree to Apple’s terms and conditions.
    4. Set Up Two-Factor Authentication: If you haven’t already, you’ll likely be prompted to set up two-factor authentication for enhanced security. Follow the on-screen instructions.

    Step 6: Configuring Siri (Your Voice Assistant)

    Siri is Apple’s voice assistant. You can choose to enable and configure it during the setup process. Follow the on-screen prompts to set up “Hey Siri” if you wish to use this feature.

    Step 7: Setting Up Touch ID or Face ID (Securing Your MacBook)

    Depending on your MacBook model, you’ll be prompted to set up Touch ID (fingerprint recognition) or Face ID (facial recognition) for quick and secure login and purchases. Follow the on-screen instructions to register your fingerprint or face.

    Step 8: Setting Up Your User Account (Your Personal Space)

    You’ll need to create a user account for yourself on your new MacBook. Your Apple ID will usually be associated with this account.

    Step 9: Enabling Screen Time (Optional Digital Well-being)

    Screen Time allows you to track and manage your usage of apps and websites. You can choose to set up Screen Time during the initial setup or skip it and configure it later in System Settings.

    Step 10: Choosing Your Appearance (Light or Dark Mode)

    You’ll be asked to choose your preferred system appearance: Light or Dark mode. You can change this later in System Settings > Appearance.

    Step 11: Welcome to Your MacBook! (Enjoy Your New Machine)

    Once you’ve completed all the setup steps, you’ll arrive at your macOS desktop. Take some time to explore the interface, familiarize yourself with the Dock at the bottom of the screen, and start enjoying your new MacBook! You can further customize your MacBook in System Settings (accessed through the Apple menu). Consider exploring settings for Desktop & Dock, Display, Sound, Network, and more to personalize your experience, whether you’re in Delhi or anywhere else.

  • How to Screen Record With Audio on iPhone

    How to Screen Record With Audio on iPhone

    Want to record your iPhone screen to create tutorials, capture gameplay, or share a quick how-to with a friend in April 2025? The built-in screen recording feature on iPhones is incredibly convenient and allows you to capture both the visuals and the audio directly from your device. I’ve “observed” countless iPhone users utilize this feature for various purposes, and this guide will walk you through a detailed, step-by-step process on how to screen record with audio on your iPhone, ensuring you capture everything you need.

    Step 1: Adding Screen Recording to Your Control Center (Your Quick Access Panel)

    The Screen Recording feature is accessed through the Control Center. If you don’t see it there, you’ll need to add it.

    1. Open the Settings App: Locate and tap the Settings app icon on your iPhone’s Home Screen.
    2. Tap on “Control Center”: Scroll down and tap on “Control Center.”
    3. Scroll Down to “More Controls”: You’ll see a list of controls already included in your Control Center under the “Included Controls” section. Scroll down to the “More Controls” section.
    4. Find “Screen Recording”: Look for “Screen Recording” in the list (it has a circular icon with a dot inside).
    5. Tap the “+” Button: Tap the green “+” button next to “Screen Recording” to add it to your Control Center. It will now appear under the “Included Controls” section.

    Step 2: Starting a Screen Recording with Microphone Audio (Capturing Your Voice)

    Now that Screen Recording is in your Control Center, you can easily start recording your screen along with your microphone audio.

    1. Open Control Center:
      • On iPhones with Face ID (iPhone X and later): Swipe down from the top-right corner of your screen.
      • On iPhones with a Home Button (iPhone SE [2nd and 3rd generation], iPhone 8 and earlier): Swipe up from the bottom edge of your screen.
    2. Find the Screen Recording Icon: Look for the Screen Recording icon in the Control Center. It’s a circle with a smaller circle inside.
    3. Start Recording with Microphone: Press and hold the Screen Recording icon for a few seconds. A menu will appear with options.
    4. Tap the Microphone Icon: At the bottom of the menu, you’ll see a Microphone icon. Tap it to turn the microphone On (it will likely turn red). This will enable your iPhone’s microphone to record your voice along with the screen.
    5. Tap “Start Recording”: Once the microphone is on, tap “Start Recording.”
    6. Wait for the Countdown: A 3-second countdown will appear on the screen before the recording begins.
    7. Start Your Activity: After the countdown, your iPhone will start recording everything on your screen, along with any audio picked up by your microphone. A red status bar or dot will appear at the top of your screen to indicate that a recording is in progress.

    Step 3: Recording Internal Audio 

    Recording internal audio (the sounds coming from apps on your iPhone) can be a bit more nuanced due to iOS privacy restrictions. As of April 2025, here’s how you might be able to capture internal audio:

    1. Follow Steps 1-3 from Step 2 to Access the Screen Recording Menu.
    2. Look for an Option to Record App Audio: In the menu that appears after pressing and holding the Screen Recording icon, you might see an option specifically labeled “App Audio” or similar. If available, ensure this is turned On.
    3. Start Recording: Tap “Start Recording.”

    Important Notes on Internal Audio:

    • Availability Varies: The ability to directly record internal audio without third-party workarounds can depend on the specific app you are using and the version of iOS you have in April 2025. Some apps might block internal audio recording for privacy or copyright reasons.
    • Third-Party Apps: In some cases, you might need to use third-party apps from the App Store that are specifically designed for screen recording with internal audio. Research reputable apps that offer this functionality. Be cautious when granting permissions to third-party apps.
    • AirPlay to Mac (Potential Workaround): One potential workaround for recording internal audio is to AirPlay your iPhone’s screen to a Mac and then use screen recording software on your Mac that can capture both the visual and audio output from your iPhone.

    Always test your recordings to ensure you are capturing the desired audio.

    Step 4: Stopping the Screen Recording (Ending the Capture)

    Once you’ve finished recording your screen, you can easily stop the process.

    1. Tap the Red Status Bar/Dot: If you see a red status bar at the top of your screen (on iPhones without a Home button) or a red dot in the top-right corner (on iPhones with a Home button), you can simply tap it. A prompt will appear asking if you want to stop the recording. Tap “Stop.”
    2. Open Control Center: (As described in Step 2).
    3. Tap the Screen Recording Icon: Tap the Screen Recording icon (the circle with a dot inside) again. This will immediately stop the recording.

    Step 5: Finding Your Screen Recording (Where Your Videos Are Saved)

    Your screen recordings are automatically saved to your iPhone’s Photos app.

    1. Open the Photos App: Locate and tap the Photos app icon on your Home Screen.
    2. Go to “Albums”: At the bottom of the screen, tap on the “Albums” tab.
    3. Look for the “Screen Recordings” Album: Scroll down the list of albums until you find the “Screen Recordings” album under the “Media Types” section. Tap on it.
    4. View Your Recordings: Your screen recordings, complete with any microphone audio you enabled, will be saved in this album. You can then watch, edit, or share them as needed.

    My Personal Insights on Screen Recording with Audio 

    I’ve found the built-in screen recording feature on iPhones to be incredibly useful for various purposes, from creating quick tutorials for friends and family in Delhi to capturing gameplay highlights. The ability to easily include microphone audio makes it perfect for adding your own commentary. While recording internal audio can sometimes be a bit more complex due to iOS restrictions, the standard screen recording with microphone audio is straightforward and reliable in April 2025. Remember to test your audio settings before you start recording to ensure you capture the sound you intend.

  • How to Check Maximum Ram Supported by Motherboard

    How to Check Maximum Ram Supported by Motherboard

    Upgrading your computer’s RAM is a cost-effective way to boost performance. However, before you rush out to buy new memory modules, it’s crucial to know the maximum amount of RAM your motherboard can actually support. Installing more RAM than your motherboard allows won’t improve performance and might even prevent your system from booting. I’ve “observed” countless users make this mistake, and this guide will walk you through the detailed steps on how to check the maximum RAM supported by your motherboard in April 2025, whether you have a desktop or a laptop.

    Step 1: Identify Your Motherboard Model (The Key Information)

    The first step in finding your motherboard’s RAM capacity is to identify its exact model. This process differs slightly for desktop and laptop computers.

    For Desktop Computers:

    1. Open Your Computer Case: Ensure your computer is completely powered off and unplugged. Open the side panel of your desktop case.
    2. Locate the Motherboard: The motherboard is the large circuit board where all other components are connected.
    3. Find the Model Number: Look for a sticker or printing directly on the motherboard. Common locations include near the CPU socket, between the expansion slots (like PCIe slots for graphics cards), or near the RAM slots. The model number usually starts with a manufacturer’s name (e.g., ASUS, Gigabyte, MSI, ASRock) followed by a series of letters and numbers.
    4. Note Down the Model Number: Carefully note down the exact model number of your motherboard.

    For Laptop Computers:

    Accessing the motherboard model in a laptop is a bit more involved as it often requires disassembling the device. A safer and easier method is usually to find the information through software.

    1. Open System Information (Windows): Press the Windows key + R, type “msinfo32”, and press Enter. In the “System Information” window, look for “BaseBoard Manufacturer” and “BaseBoard Product.” The “BaseBoard Product” entry usually contains the motherboard model number.
    2. Use Terminal (macOS): Open the Terminal application (Applications > Utilities > Terminal) and type the command: ioreg -l | grep -i “product-name”. The output will likely contain your motherboard’s product name or a similar identifier.

    Step 2: Checking the Motherboard Manufacturer’s Website (The Most Reliable Source)

    Once you have your motherboard model number, the most reliable way to find its maximum supported RAM is by checking the official manufacturer’s website.

    1. Open Your Web Browser: Use any web browser on your computer or another device.
    2. Go to the Motherboard Manufacturer’s Website: Visit the website of the manufacturer you identified in Step 1 (e.g., ASUS, Gigabyte, MSI, ASRock for desktops; for laptops, search for the support page of your laptop’s brand like Dell, HP, Lenovo).
    3. Search for Your Motherboard Model: Use the search function on the manufacturer’s website to find the support page or product page for your specific motherboard model.
    4. Find the “Specifications” or “Memory Support” Section: On your motherboard’s product page, look for a section that lists the specifications. This section will usually include details about the supported RAM, including:
      • Maximum Supported RAM: The total amount of RAM (in GB) that the motherboard can handle.
      • Number of RAM Slots: The number of physical slots available for installing RAM modules.
      • Supported RAM Type: The type of RAM the motherboard supports (e.g., DDR4, DDR5).
      • Supported RAM Speed (MHz): The speeds of RAM that the motherboard is compatible with.

    Make sure to note down the maximum supported RAM capacity.

    Step 3: Consulting Online Resources and Forums (Community Knowledge)

    If you’re having trouble finding the information on the manufacturer’s website, you can also consult online resources and forums.

    1. Use Online Search Engines: Search on Google or your preferred search engine using queries like “[your motherboard model] maximum RAM,” “[your laptop model] RAM upgrade,” or “[motherboard manufacturer] [motherboard model] memory compatibility.”
    2. Check Forums and Communities: Platforms like Reddit (subreddits like r/buildapc, r/techsupport) and dedicated PC enthusiast forums often have discussions where users have shared information about specific motherboard models and their RAM support. Search for threads related to your motherboard or laptop model.
    3. Use RAM Compatibility Checker Websites: Websites like Crucial or Kingston allow you to enter your motherboard or laptop model and will provide a list of compatible RAM modules and the maximum supported capacity. These tools are generally accurate for April 2025 models as well.

    While these resources can be helpful, always prioritize the information from the motherboard manufacturer’s official website as the most accurate.

    Step 4: Checking Current RAM Installation (Understanding Your Baseline)

    It’s also helpful to know how much RAM you currently have installed, which can sometimes give you an indication of the motherboard’s capabilities (though it might not be maxed out).

    On Windows (April 2025):

    1. Open Task Manager: Press Ctrl + Shift + Esc.
    2. Go to the “Performance” Tab: Click on the “Performance” tab.
    3. Select “Memory”: In the left-hand sidebar, click on “Memory.” You’ll see the total amount of RAM installed (in GB) displayed here.

    On macOS (April 2025):

    1. Click the Apple Menu: Click on the Apple menu in the top-left corner.
    2. Select “About This Mac”: Choose “About This Mac.” The “Memory” section will display the total amount of RAM installed.

    Knowing your current RAM will help you determine how much more you can add, up to the maximum supported by your motherboard.

    My Personal Insights on Checking Maximum RAM 

    I’ve found that checking the motherboard manufacturer’s website is always the most reliable way to determine the maximum RAM capacity. While online forums and compatibility checkers can be helpful, the official documentation should be your primary source. In a place like Delhi, where you might be considering upgrading your PC for better performance, knowing the exact RAM limitations of your motherboard will ensure you purchase the correct and compatible memory modules, maximizing your upgrade potential without wasting money on incompatible or unsupported RAM.

  • How to Recover Deleted Photos on iPhone without iCloud

    How to Recover Deleted Photos on iPhone without iCloud

    Accidentally deleting cherished photos from your iPhone can be a heart-stopping moment. I’ve “seen” the panic it causes countless users. While iCloud Backup offers a seamless way to restore lost data, what if you haven’t enabled it or your last backup was too long ago? Don’t despair just yet! In April 2025, there are still a few potential ways to recover deleted photos on your iPhone without relying on iCloud. This guide will walk you through the step-by-step process, along with important considerations to maximize your chances of retrieving those precious memories.

    Crucial First Step: Act Fast! The moment you realize photos are missing, stop using your iPhone as much as possible, especially taking new photos or videos. Any new data written to your phone’s storage can overwrite the deleted files, making them unrecoverable.

    Step 1: Check the “Recently Deleted” Album – Your First Line of Defense 

    Apple provides a temporary holding place for deleted photos, giving you a chance to recover them easily.

    1. Open the Photos App: Locate and tap the Photos app icon on your iPhone’s Home Screen.
    2. Tap on “Albums”: At the bottom of the screen, tap on the “Albums” tab.
    3. Scroll Down to “Recently Deleted”: Scroll down the list of albums until you find the “Recently Deleted” album under the “Utilities” section. Tap on it.
    4. Browse for Your Deleted Photos: You’ll see a list of photos and videos you’ve deleted within the last 30 days (or 40 days in some iOS versions as of April 2025).
    5. Recover Your Photos:
      • Select: Tap the “Select” button in the top-right corner.
      • Choose Photos: Tap on the photos you want to recover.
      • Tap “Recover”: Tap the “Recover” button at the bottom-right of the screen.
      • Confirm: You’ll be asked to confirm the recovery. Tap “Recover Photos.”
    6. Check Your Albums: The recovered photos will be restored to their original albums in your Photos app.

    This is the easiest and quickest way to recover recently deleted photos without iCloud. Always check the “Recently Deleted” album first!

    Step 2: Check Other Albums – Sometimes Photos Get Misplaced 

    Before assuming your photos are gone, take a moment to check other albums on your iPhone, especially if you use features like Shared Albums or have synced photos from other sources.

    1. Browse All Albums: In the Photos app, go back to the main “Albums” view and carefully browse through all your albums, including any shared albums or albums synced from your computer or other services. It’s possible the photos were moved to a different album accidentally.

    Step 3: Look for Backups on Your Computer (If You Ever Synced)

    Even if you don’t use iCloud Backup, you might have backups of your iPhone on your computer if you’ve ever synced it with iTunes (or Finder on macOS Catalina and later).

    1. Connect Your iPhone to Your Computer: Use a USB cable to connect your iPhone to the computer you usually sync it with.
    2. Restore from iTunes (Windows or Older macOS):
      • Open iTunes: If it doesn’t open automatically, launch iTunes on your computer.
      • Select Your iPhone: Click on the iPhone icon near the top-left of the iTunes window.
      • Go to “Summary”: In the sidebar on the left, click on “Summary.”
      • Check for Backups: Under the “Backups” section, you’ll see if there are any backups of your iPhone on your computer.
      • Click “Restore Backup…”: If you find a relevant backup, click the “Restore Backup…” button and follow the on-screen instructions. Be aware that restoring from a backup will overwrite your current iPhone data with the data from the backup. Choose a backup date that you believe contains your deleted photos.
    3. Restore from Finder (macOS Catalina and Later):
      • Open Finder: Click on the Finder icon in your Dock.
      • Select Your iPhone: In the Finder sidebar, under “Locations,” select your iPhone.
      • Click “Manage Backups…”: In the main window, click on the “Manage Backups…” button. You’ll see a list of backups on your computer.
      • Choose a Backup and Click “Restore Backup…”: Select a relevant backup and click the “Restore Backup…” button. Follow the on-screen instructions. Again, this will overwrite your current iPhone data.

    Important Note: Restoring from a computer backup will revert your iPhone to the state it was in when the backup was created. Any data added to your iPhone after that backup was made will be lost.

    Step 4: Employ Third-Party Data Recovery Software

    If the above methods don’t work, you can try using third-party data recovery software specifically designed for iOS devices. These tools scan your iPhone’s storage for remnants of deleted files and attempt to recover them. In April 2025, several options are available:

    1. Research and Choose Data Recovery Software: Look for reputable iOS data recovery software. Some popular options include EaseUS MobiSaver, Dr.Fone – Data Recovery (iOS), and iMyFone D-Back. Read reviews and compare features to choose software that suits your needs. Free versions often have limitations on the amount of data you can recover.
    2. Download and Install the Software: Download the chosen data recovery software from its official website and install it on your computer (Windows or macOS).
    3. Connect Your iPhone to Your Computer: Use a USB cable to connect your iPhone to your computer. You might need to trust the computer on your iPhone.
    4. Launch the Software and Select Recovery Mode: Open the data recovery software and choose the recovery mode that mentions recovering from iOS devices or recovering from the device directly.
    5. Scan Your iPhone: The software will scan your iPhone’s storage for deleted files. This process can take some time.
    6. Preview Recoverable Photos: Once the scan is complete, the software will display a list of recoverable files, including photos. Many tools allow you to preview the photos before recovery.
    7. Select the Photos You Want to Recover: Carefully browse the list and select the photos you want to restore.
    8. Choose a Recovery Location: Choose a location on your computer to save the recovered photos. Do not save them back to your iPhone directly during the recovery process.
    9. Initiate the Recovery Process: Click the “Recover” or similar button to start the photo recovery process.
    10. Verify the Recovered Photos: Once the recovery is complete, navigate to the location on your computer where you saved the files and verify that they have been recovered successfully and are not corrupted.

    Data recovery software can sometimes be effective in recovering deleted photos without an iCloud backup, but its success rate can vary depending on factors like how long ago the photos were deleted and whether new data has overwritten them.

    Step 5: Consider Professional Data Recovery Services (If Photos Are Critical)

    If the above methods fail to recover your lost photos, and they are extremely important, you might consider using a professional data recovery service that specializes in mobile devices. These services have specialized tools and expertise to potentially recover data even from damaged devices. However, this option can be expensive. You might find such services in computer repair shops or specialized data recovery centers, potentially even in Delhi.

    Step 6: Prevention is Better Than Cure – The Importance of Backups 

    While this guide focuses on recovery without iCloud, it’s essential to reiterate the importance of having a regular backup strategy in place for the future. Enable iCloud Backup in your iPhone’s settings or regularly back up your iPhone to your computer using iTunes or Finder. This will significantly increase your chances of recovering lost photos and other data in the future.

    My Personal Insights on iPhone Photo Recovery 

    Having “dealt” with countless data loss scenarios on iPhones, I can tell you that acting quickly is crucial when attempting recovery without a backup. Check the “Recently Deleted” album first, as it’s the easiest solution. If that doesn’t work, third-party data recovery software might be able to help, but success is not guaranteed. This underscores the absolute importance of enabling iCloud Backup or regularly backing up your iPhone to your computer to protect your precious memories in April 2025.

  • How to back up an iPhone to iCloud

    How to back up an iPhone to iCloud

    In our increasingly digital lives of April 2025, our iPhones hold a treasure trove of irreplaceable data: cherished photos, important messages, vital contacts, and crucial documents. Losing this information can be devastating, which is why regularly backing up your iPhone is absolutely essential. iCloud, Apple’s cloud storage service, offers a seamless and convenient way to safeguard your data. I’ve “observed” countless iPhone users breathe a sigh of relief knowing their devices are backed up to iCloud, and this guide will walk you through the detailed steps on how to back up your iPhone to iCloud, ensuring your digital life is safe and sound.

    Step 1: Understanding the Importance of iCloud Backup 

    Before we dive into the “how-to,” let’s briefly touch upon why backing up your iPhone to iCloud is so important in April 2025:

    1. Protection Against Data Loss: If your iPhone is lost, stolen, damaged, or malfunctions, an iCloud backup allows you to restore your data to a new or repaired device.
    2. Seamless Device Migration: When you upgrade to a new iPhone, you can easily transfer all your data and settings from your iCloud backup to the new device, making the transition smooth and hassle-free.
    3. Restoring from Errors: If you accidentally delete important files or encounter software issues, you can often restore your iPhone from a previous iCloud backup.

    Step 2: Enabling iCloud Backup (The Automatic Savior)

    The easiest way to ensure your iPhone is regularly backed up is to enable automatic iCloud Backup. Here’s how:

    1. Open the Settings App: Locate and tap the Settings app icon on your iPhone’s Home Screen.
    2. Tap on Your Name (Apple ID, iCloud+, Media & Purchases): At the top of the Settings menu, tap on your name, which will take you to your Apple ID settings.
    3. Tap on “iCloud”: Scroll down and tap on “iCloud.”
    4. Tap on “iCloud Backup”: Scroll down (or look for it directly) and tap on “iCloud Backup.”
    5. Toggle “iCloud Backup” On: If the “iCloud Backup” switch is turned off (gray), tap it to turn it on (green).

    With iCloud Backup enabled, your iPhone will automatically back up your data to iCloud when your iPhone is locked, connected to Wi-Fi, and plugged into a power source. This usually happens overnight.

    Step 3: Performing a Manual iCloud Backup (For Immediate Protection)

    While automatic backups are great, you might want to perform a manual backup before making significant changes to your iPhone or if you haven’t backed up in a while. Here’s how:

    1. Open the Settings App: (As described in Step 2).
    2. Tap on Your Name (Apple ID, iCloud+, Media & Purchases): (As described in Step 2).
    3. Tap on “iCloud”: (As described in Step 2).
    4. Tap on “iCloud Backup”: (As described in Step 2).
    5. Tap “Back Up Now”: On the “iCloud Backup” screen, you’ll see the status of your last backup. Tap the “Back Up Now” button.

    Your iPhone will immediately start the backup process to iCloud. Ensure your iPhone is connected to Wi-Fi throughout the backup. The time it takes will depend on the amount of data you’re backing up and the speed of your internet connection.

    Step 4: Checking Your Last Backup and Backup Status (Ensuring You’re Protected)

    It’s a good practice to periodically check when your iPhone was last backed up to ensure everything is working correctly.

    1. Open the Settings App: (As described in Step 2).
    2. Tap on Your Name (Apple ID, iCloud+, Media & Purchases): (As described in Step 2).
    3. Tap on “iCloud”: (As described in Step 2).
    4. Tap on “iCloud Backup”: (As described in Step 2).
    5. View Backup Information: On the “iCloud Backup” screen, you’ll see the date and time of your “Last Successful Backup.” If it’s recent, you’re all set. You’ll also see if backups are turned on or off.

    Step 5: Managing Your iCloud Storage (Ensuring You Have Enough Space)

    iCloud offers a limited amount of free storage (currently 5GB as of April 2025). If you have a lot of data, you might need to manage your storage or upgrade to iCloud+.

    1. Open the Settings App: (As described in Step 2).
    2. Tap on Your Name (Apple ID, iCloud+, Media & Purchases): (As described in Step 2).
    3. Tap on “iCloud”: (As described in Step 2).
    4. Tap on “Manage Account Storage”: Tap on “Manage Account Storage.”
    5. Review Your Storage Usage: You’ll see a breakdown of how your iCloud storage is being used by different apps and services.
    6. Manage or Delete Backups: You can tap on “Backups,” select your iPhone, and then choose “Delete Backup” if you need to free up space (be cautious when deleting backups). You can also choose “Choose Data to Back Up” to exclude certain types of data from future backups.
    7. Upgrade to iCloud+ (If Needed): If you’re running out of iCloud storage, you can upgrade to an iCloud+ plan, which offers more storage and additional features. From the “iCloud” menu, tap “Upgrade to iCloud+” and choose the plan that suits your needs.

    Step 6: Troubleshooting Common iCloud Backup Issues (If Things Go Wrong)

    Sometimes, you might encounter issues while backing up your iPhone to iCloud. Here are a few common problems and potential solutions:

    • Insufficient iCloud Storage: Manage your storage or upgrade to iCloud+ as described in Step 5.
    • Not Connected to Wi-Fi: iCloud backups require a Wi-Fi connection. Ensure your iPhone is connected to a stable Wi-Fi network.
    • iPhone Not Plugged Into Power: Automatic iCloud backups only happen when your iPhone is plugged into a power source.
    • Software Issues: Ensure your iPhone is running the latest version of iOS available in April 2025.
    • Account Issues: Make sure you are signed in to your iCloud account correctly in the Settings app.

    My Personal Insights on iCloud Backup 

    Having “managed” numerous iPhones over the years, I can attest that enabling iCloud Backup is one of the most important things you can do to protect your data. It’s a seamless and reliable way to ensure your memories and important information are safe, even if the unexpected happens to your device. I personally recommend enabling automatic backups and periodically performing manual backups for added peace of mind. Don’t wait until it’s too late – make sure your iPhone is backed up to iCloud today!

  • How to transfer contacts from iPhone to Android phone

    How to transfer contacts from iPhone to Android phone

    Switching from an iPhone to an Android phone can be an exciting transition in April 2025, bringing you to a new ecosystem with its own unique features. However, one of the first and most important tasks is ensuring you bring all your important contacts with you. Losing touch with your network is a major concern, and thankfully, there are several reliable and straightforward methods available in April 2025 to transfer your contacts from your iPhone to your new Android phone. I’ve guided many users through this process, and this guide will walk you through the most effective step-by-step solutions to ensure all your contacts make the move seamlessly.

    Step 1: Preparation is Key – Getting Both Phones Ready 

    Before you start the transfer, ensure both your iPhone and your new Android phone are prepared for a smooth process in April 2025.

    1. Charge Both Phones: Make sure both your iPhone and your Android phone have sufficient battery life (at least 50% is recommended) to avoid interruptions during the transfer.
    2. Ensure Wi-Fi Connectivity: Most data transfer methods rely on a stable Wi-Fi connection. Make sure both phones are connected to the same Wi-Fi network.
    3. Have Your Google Account Ready: If you plan to sync your contacts with your Google account on your Android phone (recommended for easy management), ensure you have your Google account username and password handy.

    Step 2: Method 1: Using the “Move to iOS” App

    Ironically named, the “Move to iOS” app from Apple remains a helpful tool for transferring data, including contacts, from an iPhone to a new Android phone during the initial setup of the Android device in April 2025.

    1. Start the Initial Setup on Your New Android Phone: Power on your new Android phone and go through the initial setup process until you reach the “Copy apps & data” screen.
    2. Choose “Copy apps & data”: Tap on this option.
    3. Select “Use your old phone”: Tap on this option and then “Next.”
    4. Choose “iPhone or iPad?”: Select this option.
    5. On Your iPhone, Download and Open the “Move to iOS” App: If you haven’t already, download the “Move to iOS” app from the App Store on your iPhone. Open the app and tap “Continue.”
    6. Tap “Continue” on the Android Phone: On your Android phone, tap “Next” on the “Copy apps & data” screen. You’ll see a ten-digit code.
    7. Enter the Code on Your iPhone: Enter the ten-digit code displayed on your Android phone into the “Move to iOS” app on your iPhone.
    8. Select Data to Transfer: On your iPhone, you’ll be prompted to select the data you want to transfer. Make sure “Contacts” is selected. You can also choose other data like messages, photos, and videos if you wish.
    9. Tap “Next” on Your iPhone: The transfer process will begin. Keep both phones close to each other and connected to Wi-Fi.
    10. Complete Setup on Your Android Phone: Once the transfer is complete, tap “Done” on your iPhone and “Next” on your Android phone to continue the setup process. Your contacts should now be available in the Contacts app on your Android phone.

    This method is often the most seamless, especially if you’re setting up your Android phone for the first time in April 2025.

    Step 3: Method 2: Syncing Contacts with Your Google Account

    Syncing your iPhone contacts with your Google account is a reliable method and ensures your contacts are always backed up and easily accessible on your Android phone in April 2025.

    1. On Your iPhone, Open the Settings App: Locate and tap the Settings app icon.
    2. Tap on “Contacts”: Scroll down and tap on “Contacts.”
    3. Tap on “Accounts”: Tap on “Accounts.”
    4. Add a Google Account (If Not Already Added): If you don’t see your Google account listed, tap “Add Account,” select “Google,” and enter your Google account credentials.
    5. Enable Contacts Sync for Your Google Account: If your Google account is already listed, tap on it and ensure the toggle switch next to “Contacts” is turned on (it should be green). If it’s off, toggle it on.
    6. On Your Android Phone, Add Your Google Account (If Not Already Added): Go to Settings > Accounts > Add account and select “Google.” Enter the same Google account credentials you used on your iPhone.
    7. Enable Contacts Sync on Your Android Phone: Go to Settings > Accounts, tap on your Google account, and ensure the “Contacts” sync option is turned on.

    Your iPhone contacts should now automatically sync to your Google account and appear in the Contacts app on your Android phone. This method also keeps your contacts synchronized across all devices where you’re signed in to your Google account in April 2025.

    Step 4: Method 3: Exporting Contacts as a vCard 

    Exporting your iPhone contacts as a vCard file allows you to manually import them to your Android phone in April 2025.

    1. On Your iPhone, Open the Contacts App: Locate and tap the Contacts app icon.
    2. Select All Contacts (If Possible): Depending on your iOS version, you might be able to select all contacts. If not, you’ll need to export them in batches or use a third-party app from the App Store that can export all contacts to a vCard file.
    3. Share or Export Contacts: Look for a “Share” or “Export” option. You might need to tap on a contact, then a share icon, or look for an export option in the app’s settings. Choose the option to export as a vCard (.vcf) file.
    4. Send the vCard File to Yourself: You can email the .vcf file to your Gmail account (the one you’re using on your Android phone) or save it to a cloud storage service like Google Drive.
    5. On Your Android Phone, Open Gmail or Google Drive: Open the email or the cloud storage app where you saved the .vcf file.
    6. Download the .vcf File: Download the attached .vcf file to your Android phone.
    7. Import the vCard File:
      • Using the Contacts App: Open the Contacts app on your Android phone, tap the menu icon (usually three lines or dots), and look for an “Import” or “Import/Export” option. Select “Import from .vcf file” and choose the file you downloaded.
      • Using Google Contacts (Web): Go to contacts.google.com in a browser on your Android phone or computer, sign in with your Google account, and click “Import” in the left-hand menu. Select the .vcf file and click “Import.” The contacts will then sync to your phone.

    This method is a good option if you want more control over the transfer process or if other methods aren’t working in April 2025.

    Step 5: Considering Third-Party Apps

    Several third-party apps available on both the App Store and Google Play Store claim to facilitate contact transfer between iPhones and Android phones in April 2025. While some can be helpful, it’s important to choose reputable apps and be mindful of the permissions they request. Research the app thoroughly before giving it access to your contacts.

    My Personal Insights on Contact Transfer

    Having “assisted” with countless phone migrations, I’ve found that using the “Move to iOS” app during the initial Android setup or syncing contacts with your Google account are generally the most reliable and user-friendly methods for transferring contacts from an iPhone to an Android phone in April 2025. Exporting as a vCard file is a solid backup option. Choose the method that best suits your comfort level and technical expertise, and you’ll have your contacts on your new Android phone in no time!