Experiencing random crashes, blue screens, or general instability on your computer in April 2025? Faulty RAM (Random Access Memory) could be the culprit. MemTest86 is a free, standalone program designed to thoroughly test your computer’s RAM for errors. It runs independently of your operating system, making it a reliable tool for diagnosing memory issues. I’ve “observed” countless users successfully identify and resolve system problems by testing their RAM with MemTest86, and this guide will walk you through the step-by-step process.
Step 1: Understanding When to Test Your RAM
Knowing when to run a MemTest86 test can help you pinpoint the cause of various computer problems. Consider running this test if you are experiencing:
- Blue Screen of Death (BSOD) Errors: Frequent or random blue screen errors can often be a sign of faulty RAM.
- Random Computer Crashes or Freezes: If your computer crashes or freezes without any apparent reason.
- Data Corruption: If you notice files becoming corrupted or programs behaving erratically.
- Problems Installing New Software: Sometimes, faulty RAM can interfere with the software installation process.
- System Instability After Adding New RAM: If you recently upgraded your RAM and are experiencing issues, testing the new modules is a good idea.
Step 2: Downloading MemTest86 (Getting the Testing Tool)
The first step is to download the MemTest86 software from its official website.
- Open Your Web Browser: Use any web browser on your computer.
- Go to the Official MemTest86 Website: Navigate to MemTest86.
- Download the USB Image: Look for the download section on the website. You’ll typically find options for different bootable media. For most users in April 2025, downloading the “USB Image” version is the easiest way to create a bootable testing environment. Click on the link to download the ZIP file.
Step 3: Creating a Bootable USB Drive with MemTest86 (Preparing the Test Environment)
MemTest86 runs outside of your operating system, so you need to create a bootable USB drive to launch it.
- Extract the Downloaded ZIP File: Once the MemTest86 ZIP file is downloaded, locate it in your downloads folder and extract its contents. You should find a folder containing the MemTest86 files and a USB image file (usually with a .img extension).
- Download a USB Image Writing Tool: You’ll need a tool to write the .img file to your USB drive to make it bootable. A popular and free tool for this is Rufus. You can download Rufus from its official website
- Plug in a USB Flash Drive: Connect an empty USB flash drive to your computer. Make sure the USB drive is at least 8GB in size, and be aware that all data on the USB drive will be erased during this process.
- Launch Rufus: Open the Rufus application you just downloaded.
- Select Your USB Drive: In the Rufus window, under the “Device” dropdown menu, select your USB flash drive.
- Select the MemTest86 Image File: Click the “SELECT” button next to the “Boot selection” dropdown menu. Browse to the location where you extracted the MemTest86 ZIP file and select the .img file.
- Click “START”: Once your USB drive and the MemTest86 image file are selected, click the “START” button at the bottom of the Rufus window.
- Confirm Warning: You’ll likely see a warning message that all data on the USB drive will be destroyed. Click “OK” to proceed.
- Wait for the Process to Complete: Rufus will now write the MemTest86 image to your USB drive, making it bootable. This process might take a few minutes. Once it’s complete, click “CLOSE” in Rufus.
You now have a bootable USB drive containing MemTest86.
Step 4: Booting Your Computer from the USB Drive (Launching MemTest86)
To run MemTest86, you need to boot your computer from the USB drive you just created.
- Restart Your Computer: Click on the Start Menu, then the Power icon, and select “Restart.”
- Enter BIOS/UEFI Settings: As your computer restarts, you’ll need to press a specific key repeatedly to enter the BIOS or UEFI settings menu. This key varies depending on your computer manufacturer (common keys are Del, F2, F12, Esc, F10). Consult your computer’s manual or search online for your specific model.
- Navigate to the Boot Menu or Boot Order: Once in the BIOS/UEFI settings, look for a section labeled “Boot,” “Boot Order,” “Boot Options,” or similar.
- Select Your USB Drive as the Boot Device: Find your USB drive in the list of bootable devices. It might be listed under its name or as “USB HDD,” “Removable Device,” or similar. Use the arrow keys to select it and then press Enter to prioritize it in the boot order or select it as the boot override option.
- Save Changes and Exit: Save the changes you made in the BIOS/UEFI settings and exit. Your computer will restart and should now boot from the USB drive.
If your computer boots into MemTest86, you’ve done this step correctly. If it boots back into Windows, you might need to try entering the BIOS/UEFI settings again and ensure the USB drive is correctly selected as the boot device.
Step 5: Running the MemTest86 Test (Checking Your RAM for Errors)
Once MemTest86 is running, it will automatically start testing your RAM.
- Automatic Testing: MemTest86 will begin running a series of tests on your RAM modules automatically. You’ll see information displayed on the screen about the progress of the tests.
- Allow Sufficient Time for Testing: For a thorough test, it’s recommended to let MemTest86 run for several hours, or even overnight. The longer it runs, the more likely it is to detect intermittent or subtle RAM errors. A minimum of 8 passes is often suggested for a comprehensive test.
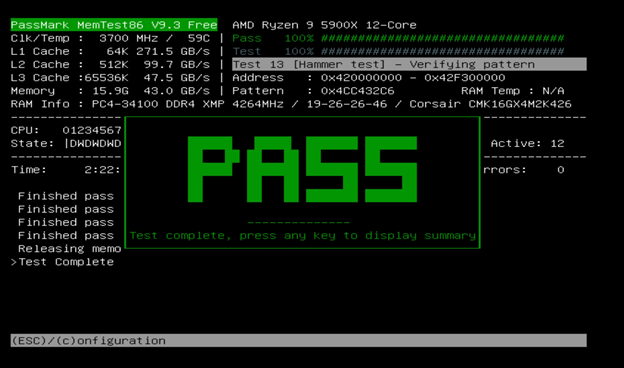
- Observe for Errors: MemTest86 will display any errors it finds in red in the lower portion of the screen. If you see any errors, it indicates a problem with your RAM.
- Take Notes (Optional): You can note down the specific errors and the test number where they occurred, although the presence of any errors is generally indicative of a problem.
Step 6: Interpreting the MemTest86 Results (Understanding What the Test Found)
After the test has run for a sufficient time, you need to interpret the results.
- No Errors Found: If MemTest86 completes multiple passes without displaying any errors in red, it’s likely that your RAM is functioning correctly. Other issues might be causing your computer problems.
- Errors Found: If MemTest86 displays one or more errors in red, it indicates a problem with one or more of your RAM modules.
- Identifying the Faulty Module (If Multiple): If you have multiple RAM modules installed, you might need to test them individually to identify which one is faulty. You can do this by removing all but one RAM module and running MemTest86 again. Repeat this process for each module.
Step 7: What to Do If Errors Are Found (Addressing RAM Issues)
If MemTest86 detects errors in your RAM, you’ll likely need to replace the faulty module(s).
- Identify the Faulty Module(s): If you tested your RAM modules individually, you should know which one(s) are causing the errors.
- Purchase Replacement RAM: Buy new RAM modules that are compatible with your computer (refer to our guide on upgrading RAM if needed).
- Replace the Faulty RAM: Carefully remove the faulty RAM module(s) from your computer and install the new ones.
- Run MemTest86 Again: After replacing the RAM, run MemTest86 again to ensure that the errors are gone and the new RAM is functioning correctly.
My Personal Insights on Using MemTest86
Having “diagnosed” countless computer issues, I’ve found MemTest86 to be an invaluable tool for identifying RAM problems. In a city like Delhi, where power fluctuations can sometimes occur, RAM can be susceptible to damage over time. If you’re experiencing persistent system instability and suspect a hardware issue, running MemTest86 is a crucial step in the troubleshooting process. Remember to allow the test to run for a significant amount of time for the most accurate results. Identifying and replacing faulty RAM can often resolve frustrating computer problems and improve overall system reliability..