Blog

  • How to Enable Two-Step Verification on Your Samsung Account

    How to Enable Two-Step Verification on Your Samsung Account

    In today’s digital world, protecting your online accounts is more critical than ever. Your Samsung account serves as a central hub for many of Samsung’s services and devices, from Samsung Cloud backups and Galaxy Store access to Samsung Pay and SmartThings. Enabling two-step verification (also known as 2FA or two-factor authentication) adds a crucial layer of security, making it significantly harder for unauthorized individuals to access your account, even if they manage to get hold of your password.

    Two-step verification works by requiring a second form of identification in addition to your password when you try to sign in to your Samsung account. This second “step” is typically something only you would have, like a code sent to your registered phone or generated by an authentication app. This security measure has become an industry standard for protecting sensitive information across various online platforms.

    This “how-to” guide will walk you through the process of setting up two-step verification for your Samsung account directly from your Samsung Galaxy phone, as well as managing your verification methods.

    Why Two-Step Verification is Essential

    Consider this: passwords can be stolen through phishing attacks, data breaches, or even simple guesswork. If someone gains access to your Samsung account password without two-step verification enabled, they could:

    • Access your personal Samsung Cloud data, including photos, videos, and documents.
    • Make unauthorized purchases through Samsung Pay.
    • Control your smart home devices via SmartThings.
    • View your device’s location using Find My Mobile.
    • Potentially gain access to other linked services.

    With two-step verification, even if a malicious actor has your password, they would still need the second verification code, which is sent to your trusted device or generated by an app on your phone. This significantly reduces the risk of unauthorized access.

    Method 1: Enabling Two-Step Verification from Your Samsung Galaxy Phone

    This is the most common and recommended way to enable two-step verification for your Samsung account. The process is integrated directly into your phone’s settings.

    Step-by-Step Guide:

    1. Open Settings: On your Samsung Galaxy phone, tap on the Settings app. You can usually find it on your home screen, in your app drawer, or by swiping down from the top of the screen and tapping the gear icon.
    2. Access Samsung Account: At the very top of the Settings menu, you will see your Samsung account profile (your name or profile picture). Tap on it.
    3. Navigate to Security and Privacy: Within your Samsung account settings, scroll down and tap on “Security and privacy” (or sometimes just “Security”).
    4. Find Two-step verification: Tap on “Two-step verification”. You might be prompted to enter your Samsung account password at this point for security reasons. Enter your password and proceed.
    5. Start Setup Process:
      • You’ll likely see an introductory screen explaining two-step verification. Tap “Start” or “Turn on” to begin the setup.
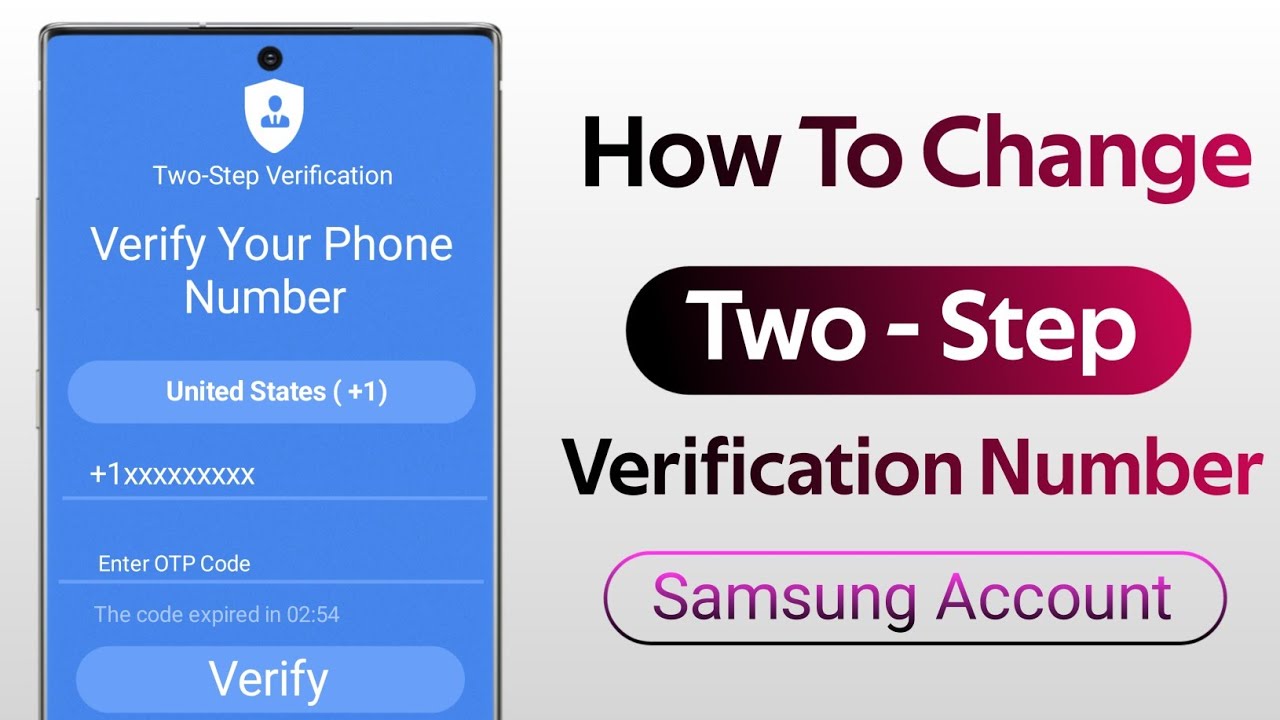
    6. Verify Phone Number (SMS method):
      • The primary method for two-step verification is usually SMS. You’ll be asked to verify the phone number you want to use to receive verification codes.
      • Enter your phone number if it’s not already pre-filled.
      • Tap “Verify” or “Send code”.
      • A six-digit verification code will be sent to this number via text message. Enter this code into the prompt on your phone.
      • Tap “Verify” to confirm.
      • Note: You can often register up to three phone numbers to receive verification codes via SMS. This is useful if you have multiple devices or want a backup number. To add more numbers, after the initial setup, you can go back into the “Two-step verification” settings and find an option to “Add phone number.”
    7. Generate Backup Codes (Crucial Step!):
      • After setting up the SMS method, Samsung will provide you with a set of backup codes. These are critical for regaining access to your account if you lose your phone, change your phone number, or cannot receive SMS codes for any reason.
      • Tap “Generate codes” or “Show codes”.
      • Write these codes down immediately and store them in a safe, offline place (e.g., a physical notebook, a secure safe). Do not save them on your phone or in an easily accessible digital location like an unencrypted cloud drive. Each code can typically be used only once.
      • Tap “Done” or “Confirm” once you have safely recorded your backup codes.
    8. Optionally Add Authenticator App:
      • Samsung also allows you to use an authenticator app (like Microsoft Authenticator, Google Authenticator, or Authy) for generating codes. This method is often preferred for its security, as it doesn’t rely on cellular networks.
      • In the Two-step verification settings, look for an option like “Authenticator app” or “Add OTP” (One-Time Password app).
      • Follow the on-screen instructions, which typically involve scanning a QR code with your authenticator app or manually entering a setup key.
      • Enter the code generated by the authenticator app to verify the setup.

    Method 2: Enabling Two-Step Verification from the Samsung Account Website

    You can also enable two-step verification for your Samsung account through a web browser on a computer or another device.

    Step-by-Step Guide:

    1. Go to Samsung Account Website: Open your web browser and navigate to the official Samsung account website: account.samsung.com.
    2. Sign In: Enter your Samsung account ID (email address) and password to sign in.
    3. Access Security Settings: Once logged in, look for a “Security” or “Security and privacy” tab or section. It’s usually in the navigation bar or a dropdown menu for your profile. You might need to re-enter your password for security confirmation.
    4. Find Two-step verification: Locate the “Two-step verification” option and click on it.
    5. Follow On-Screen Prompts: The website will guide you through a similar setup process as on the phone, allowing you to:
      • Add and verify your phone number for SMS codes.
      • Generate and save your backup codes.
      • Set up an authenticator app.

    Managing Trusted Devices

    Once two-step verification is enabled, every new device or browser you use to sign in to your Samsung account will require a verification code. However, you can mark a device as “trusted” after a successful login.

    • When you successfully enter a two-step verification code on a device, you’ll often see an option like “Skip two-step verification on this device next time” or “Don’t ask again on this device.”
    • Selecting this option adds the device to your list of trusted devices. On trusted devices, you will only need your password to sign in, making the experience more convenient while maintaining security.
    • You can manage your trusted devices within the Two-step verification settings on your Samsung phone or the Samsung account website. It’s good practice to review and remove old or lost devices from this list.

    Important Security Tips

    • Keep your password strong and unique: Use a complex password that is not easily guessable and different from passwords used for other online services.
    • Update your phone number: If you change your phone number, promptly update it in your Samsung account’s two-step verification settings to ensure you can receive codes.
    • Secure your backup codes: These are your ultimate lifeline. Treat them like cash and store them safely.
    • Be wary of phishing attempts: Always double-check the sender of any emails or messages asking for your Samsung account details or verification codes. Samsung will never ask for your password via email.
    • Regularly review account activity: Periodically check your Samsung account activity for any suspicious logins.

    By enabling and properly managing two-step verification for your Samsung account, you significantly enhance your digital security, protecting your personal data and connected services from unauthorized access. This proactive step is a small effort for a large gain in peace of mind.

    Frequently Asked Questions (FAQ)

    Q1: What is two-step verification for a Samsung account?

    Two-step verification (also called 2FA or two-factor authentication) is an extra layer of security for your Samsung account. Besides your password, it requires a second piece of information, usually a code sent to your phone or generated by an authenticator app, when you sign in. This ensures that even if someone knows your password, they can’t access your account without this second step.

    Q2: Why should I enable two-step verification on my Samsung account?

    You should enable two-step verification to protect your personal data and access to Samsung services (like Samsung Cloud, Samsung Pay, Find My Mobile, etc.). It prevents unauthorized access even if your password is stolen or compromised, significantly enhancing your account’s security against hacking attempts.

    Q3: What happens if I lose my phone and have two-step verification enabled?

    If you lose your phone, you can still access your Samsung account using your backup codes that you generated and saved when you set up two-step verification. Alternatively, if you linked an authenticator app to a different device, you can use that. If you added multiple phone numbers, you can receive the code on another registered number. This is why saving backup codes is crucial.

    Q4: Can I disable two-step verification on my Samsung account?

    For enhanced security, Samsung typically does not allow users to completely disable two-step verification once it’s enabled. However, you can manage your trusted devices so that you don’t need to enter a code every time you sign in on frequently used devices. This provides convenience while maintaining the overall security of your account.

    Q5: What is an authenticator app, and how does it work with my Samsung account?

    An authenticator app (like Microsoft Authenticator, Google Authenticator, or Authy) is a smartphone application that generates time-sensitive, one-time passwords (OTP) or codes. When you set it up with your Samsung account, the app syncs to generate a new code every 30-60 seconds. When you sign in, instead of receiving an SMS, you open the authenticator app and enter the current code it displays. This method is often more secure than SMS as it doesn’t rely on cellular network vulnerabilities.

    Q6: What are backup codes, and where should I keep them?

    Backup codes are a set of unique, one-time use codes provided to you when you enable two-step verification. Each code can be used once to sign in if you cannot receive SMS codes or use your authenticator app. It is critical to write these codes down and store them in a very safe, offline location, such as a secure physical safe, a locked drawer, or a password manager that is itself protected by strong security. Do not store them unencrypted on your phone or computer.

  • How to Cast Your Samsung Phone to a Smart TV

    How to Cast Your Samsung Phone to a Smart TV

    In an age where our smartphones hold our photos, videos, and favorite apps, the ability to seamlessly display this content on a larger screen is incredibly valuable. Casting your Samsung phone to a Smart TV allows you to share media, deliver presentations, play mobile games, or simply mirror your phone’s entire interface for a more immersive viewing experience.

    The evolution of screen sharing technology has come a long way. Early methods often relied on physical cables. However, with the advent of Smart TVs and wireless protocols, casting has become incredibly convenient. Samsung, a prominent player in both smartphone and TV markets, has developed its own robust casting solutions, such as Smart View and Tap View, alongside supporting industry standards like Google Cast (Chromecast). This guide will explore the most effective and common methods to cast your Samsung phone to a Smart TV, ensuring you can effortlessly enjoy your mobile content on the big screen.

    Method 1: Using Smart View (Samsung’s Native Casting Feature)

    Smart View is Samsung’s proprietary screen mirroring technology, designed for seamless integration between Samsung Galaxy phones and Samsung Smart TVs. It utilizes the Miracast wireless display standard, making it widely compatible with many other Smart TVs as well.

    Prerequisites:

    • Both your Samsung phone and your Smart TV must be connected to the same Wi-Fi network.
    • Your Smart TV must be turned on and have its Wi-Fi enabled.

    Step-by-Step Guide:

    1. Open Quick Settings on Your Phone:
      • Swipe down twice from the top of your Samsung phone’s screen to fully expand the Quick Settings panel.
    2. Locate Smart View:
      • Look for the “Smart View” icon. It often looks like two overlapping rectangles or a play symbol with Wi-Fi waves.
      • If you don’t see it immediately, swipe left or right on the Quick Settings panel to find it. You might also need to tap the pencil icon to edit your Quick Settings buttons and add it.
    3. Select Your TV:
      • Tap the “Smart View” icon. Your phone will begin searching for nearby compatible devices.
      • A list of available Smart TVs will appear. Select your Smart TV from the list.
    4. Confirm Connection (on TV):
      • The first time you connect, your Smart TV may display a pop-up asking for permission to allow the connection from your phone. Use your TV remote to select “Allow” or “Accept”.
    5. Start Mirroring:
      • Your Samsung phone’s screen will now be mirrored directly onto your Smart TV.
    6. Manage Smart View (On Phone):
      • A small Smart View icon/overlay will appear on your phone’s screen. Tapping this often reveals options like:
        • Pause Mirroring: Temporarily stop the display.
        • Change Phone Aspect Ratio: Adjust how your phone’s screen fits the TV.
        • Disconnect: Stop mirroring.
        • Turn off TV screen: To save battery on your phone while still casting.

    Method 2: Using Tap View (For Newer Samsung Phones and TVs)

    Tap View is an even more convenient feature available on newer Samsung Galaxy phones and Samsung Smart TVs (2020 models and later). It uses NFC and Bluetooth for initial handshake, followed by Wi-Fi Direct for screen mirroring.

    Prerequisites:

    • Samsung Phone: Galaxy S20 series or newer (running One UI 2.1 or later).
    • Samsung Smart TV: 2020 model or later (e.g., QLED, Crystal UHD TVs).
    • Both devices must have Tap View enabled (usually found in TV settings under General > External Device Manager > Device Connection Manager > Notification Mode).
    • Both devices should have Bluetooth and Wi-Fi turned on.

    Step-by-Step Guide:

    1. Enable Tap View on Your TV:
      • On your Samsung Smart TV, go to Settings > General > External Device Manager > Device Connection Manager > Notification Mode and set it to “On”.
      • Also, ensure “Tap View” is enabled on the TV.
    2. On Your Samsung Phone:
      • Go to Settings > Advanced features > Motions and gestures > Tap View, Tap sound and make sure it’s On.
    3. Tap Your Phone to the TV:
      • Gently tap the back of your Samsung phone to the side or top bezel of your Samsung Smart TV.
      • Ensure the phone is not tapped directly on the screen itself to prevent damage.
    4. Confirm Connection (on Phone and TV):
      • Your phone will vibrate, and a pop-up asking for permission to cast will appear on both your phone and TV.
      • Tap “Start now” on your phone and “Allow” on your TV.
    5. Start Mirroring:
      • Your phone’s screen will immediately begin mirroring to your Smart TV.

    Method 3: Using Google Cast / Chromecast Built-in

    Many Smart TVs, regardless of brand, have Google Cast (often marketed as Chromecast built-in) functionality. This allows you to “cast” content from compatible apps directly to your TV.

    Prerequisites:

    • Both your Samsung phone and Smart TV must be on the same Wi-Fi network.
    • Your Smart TV must have Chromecast built-in or you need a separate Chromecast device plugged into an HDMI port.
    • The app you want to cast from (e.g., YouTube, Netflix, Spotify) must support casting.

    Step-by-Step Guide:

    1. Open a Cast-Compatible App:
      • On your Samsung phone, open an app that supports casting (e.g., YouTube, Netflix, Google Photos, Spotify, etc.).
    2. Locate the Cast Icon:
      • Within the app, look for the Cast icon (it looks like a screen with a Wi-Fi symbol in the bottom-left corner).
    3. Select Your TV:
      • Tap the Cast icon. A list of available Chromecast-enabled devices (your Smart TV or a Chromecast dongle) will appear.
      • Select your Smart TV from the list.
    4. Start Casting:
      • The content from your phone app will now appear on your Smart TV. You can control playback (pause, skip, volume) directly from your phone.
      • Unlike Smart View, Google Cast typically doesn’t mirror your entire phone screen. Instead, it “sends” the content stream directly to the TV, allowing you to use your phone for other tasks while the content plays on the TV.
    5. Stop Casting:
      • To stop casting, tap the Cast icon again within the app on your phone and select “Disconnect.”

    Method 4: Using Google Home App (for Screen Mirroring to Chromecast)

    If your Smart TV has Chromecast built-in (but not necessarily Miracast), or you’re using a physical Chromecast device, the Google Home app can mirror your entire Samsung phone’s screen.

    Prerequisites:

    • Google Home app installed on your Samsung phone.
    • Your Smart TV (or Chromecast device) set up in the Google Home app.
    • Both devices on the same Wi-Fi network.

    Step-by-Step Guide:

    1. Open Google Home App:
      • Launch the Google Home app on your Samsung phone.
    2. Select Your TV/Chromecast:
      • On the main screen of the Google Home app, you’ll see a list of your connected devices. Tap on the icon for your Smart TV or Chromecast device.
    3. Start Casting Screen:
      • At the bottom of the device control screen, tap “Cast my screen.”
      • Confirm by tapping “Cast screen” again on the pop-up.
      • Your Samsung phone’s screen will now be mirrored to your TV.
    4. Stop Casting:
      • To stop, open the Google Home app again, select your device, and tap “Stop mirroring.”

    Method 5: Wired Connection (HDMI Adapter)

    While wireless is convenient, a wired connection offers the most stable connection with no lag, especially useful for gaming or critical presentations.

    Prerequisites:

    • Samsung phone with USB-C port that supports DisplayPort Alternate Mode (Alt Mode). (Most modern flagship Samsung phones do, but check your model’s specifications. Older or budget models might not).
    • USB-C to HDMI adapter or USB-C to HDMI cable.
    • HDMI cable (if using an adapter).
    • Smart TV with an available HDMI input.

    Step-by-Step Guide:

    1. Connect Adapter/Cable to Phone:
      • Plug the USB-C end of the adapter or cable into your Samsung phone’s USB-C port.
    2. Connect to TV:
      • Connect the HDMI end of the adapter/cable to an available HDMI input on your Smart TV.
    3. Select HDMI Input on TV:
      • Use your Smart TV’s remote control to switch the TV’s input source to the corresponding HDMI port you used.
    4. Start Displaying:
      • Your Samsung phone’s screen should automatically appear on the TV. No special settings are usually required on the phone.
      • Some Samsung phones might even activate Samsung DeX mode automatically, providing a desktop-like interface on your TV.

    Troubleshooting Common Casting Issues

    • Not Finding TV:
      • Ensure both devices are on the same Wi-Fi network.
      • Restart both your Samsung phone and your Smart TV (unplugging the TV from power for 30 seconds can help).
      • Check your TV’s settings to ensure screen mirroring/casting features are enabled.
    • Lag or Choppy Playback:
      • Wi-Fi interference: Move closer to your Wi-Fi router.
      • Network congestion: Too many devices on your network can slow down casting.
      • Phone performance: Close unnecessary apps on your phone.
      • For the best performance, a wired HDMI connection is always superior.
    • No Sound:
      • Check the volume on both your Samsung phone and your Smart TV.
      • Ensure your TV’s audio output is correctly configured.
    • Black Screen/Blank Screen:
      • Verify the TV’s input source is correctly selected.
      • Restart both devices.
      • If using an adapter, try a different one or check for compatibility.
    • Permission Pop-up on TV Not Appearing:
      • Check your TV’s settings for “Device Connection Manager” or “Screen Mirroring permissions” and ensure it’s set to “Always Allow” or “Notification Mode On.”

    Conclusion

    Casting your Samsung phone to a Smart TV is a versatile and essential capability for modern users. With various methods at your disposal – from Samsung’s Smart View and innovative Tap View to the widely supported Google Cast and reliable wired HDMI connections – you have multiple avenues to project your mobile content onto the big screen. By understanding these options and their specific requirements, you can effortlessly share photos, watch videos, play games, and make the most of your Samsung Galaxy device and Smart TV together.

    FAQ

    Q1: What is the easiest way to cast my Samsung phone to a Samsung Smart TV?

    The easiest way is typically using Smart View. Simply swipe down on your Samsung phone to access Quick Settings, tap the Smart View icon, and select your Samsung Smart TV. If you have a newer Samsung phone and TV (2020+ models), Tap View is even simpler: just tap your phone to the side of the TV.

    Q2: My TV is not a Samsung TV. Can I still cast my Samsung phone to it?

    Yes, absolutely! Most non-Samsung Smart TVs support Miracast (which Smart View uses) or have Chromecast built-in.

    • For Miracast-compatible TVs, try Smart View from your Samsung phone. Look for “Screen Mirroring,” “Wireless Display,” or “Miracast” in your TV’s input or network settings.
    • For TVs with Chromecast built-in, use the Google Cast icon within compatible apps (like YouTube, Netflix) or the Google Home app for full screen mirroring.

    Q3: Why is my Samsung phone not finding my Smart TV when I try to cast?

    The most common reasons are:

    • Not on the same Wi-Fi network: Both your Samsung phone and Smart TV must be connected to the exact same Wi-Fi network.
    • TV not ready: Ensure your Smart TV is turned on, its Wi-Fi is enabled, and its screen mirroring/casting feature is active or discoverable.
    • Network issues: Try restarting your Wi-Fi router.
    • TV settings: Some TVs require you to enable screen mirroring in their settings menu.

    Q4: Can I cast my Samsung phone’s screen to my TV and still use my phone for other things?

    • When using Smart View or Google Home’s “Cast my screen” feature, your entire phone screen is mirrored, so whatever you do on your phone will show on the TV. This means using your phone for other tasks will interrupt the TV display.
    • However, when using Google Cast (Chromecast built-in) from within an app (like Netflix or YouTube), the app sends the content directly to the TV. You can then use your Samsung phone for other activities, like Browse social media or texting, without interrupting the video on the TV.

    Q5: What is Samsung DeX, and how is it related to casting?

    Samsung DeX is a feature on many high-end Samsung Galaxy phones that allows you to connect your phone to a monitor or TV and experience a desktop-like interface. While it’s a form of casting/displaying, it’s more advanced than simple screen mirroring. When you connect a DeX-compatible Samsung phone via an HDMI adapter or wirelessly to a compatible Smart TV or monitor, it can launch the DeX interface, allowing you to use your phone as a mini-computer with separate apps running on the TV.

    Q6: Does casting consume a lot of battery on my Samsung phone?

    Yes, wireless casting (Smart View, Tap View, Google Cast screen mirroring) can consume a significant amount of battery on your Samsung phone. Your phone’s processor and Wi-Fi radio are constantly working to encode and transmit the video stream. For extended casting sessions, it’s advisable to keep your phone plugged into a charger. Wired HDMI connections do not consume as much battery for screen output as wireless methods.

    Q7: Can I cast protected content (like from certain streaming apps) to my TV?

    Most major streaming apps (Netflix, Hulu, Disney+, Amazon Prime Video) are designed to work seamlessly with Google Cast (Chromecast built-in). However, apps with very strict Digital Rights Management (DRM) policies might prevent full screen mirroring via Miracast (Smart View) for certain content. Always check the specific app’s capabilities or content restrictions.

  • How to Transfer Data Wirelessly from Old Samsung to New Samsung

    How to Transfer Data Wirelessly from Old Samsung to New Samsung

    Upgrading to a new Samsung Galaxy phone is exciting, but the thought of moving all your precious data – photos, contacts, messages, apps, and settings – can often feel daunting. Fortunately, Samsung and Android offer several robust wireless transfer methods that make this process incredibly simple and efficient, allowing you to get your new phone set up exactly like your old one without the hassle of cables.

    Gone are the days of manually copying files or losing important information. Modern Samsung devices come equipped with powerful tools like Samsung Smart Switch, and leverage cloud services such as Google Drive and Samsung Cloud, ensuring a smooth transition. These tools are designed to handle everything from your personalized home screen layout to your detailed call logs, making your new phone feel instantly familiar.

    This guide will walk you through the most effective wireless methods to transfer your data, ensuring a seamless migration from your old Samsung Galaxy to your brand-new one.

    Method 1: Using Samsung Smart Switch (Recommended for All Data)

    Samsung Smart Switch is the official and most comprehensive tool for transferring data between Samsung Galaxy devices, and it excels at wireless transfers. It allows you to move almost everything, including contacts, messages, photos, videos, apps, settings, call history, and even your home screen layout.

    Before You Start:

    • Charge Both Phones: Ensure both your old and new Samsung phones are charged to at least 50% to prevent interruption.
    • Install Smart Switch: The Smart Switch app is usually pre-installed on newer Samsung Galaxy devices. If not, download it from the Galaxy Store or Google Play Store on both phones.
    • Proximity: Keep both phones close to each other (within 4 inches is ideal).
    • Wi-Fi Connection: While Smart Switch can often create its own direct wireless connection (Wi-Fi Direct), having both devices connected to the same strong Wi-Fi network can improve stability for large transfers.

    Step-by-Step Wireless Transfer with Smart Switch:

    1. Launch Smart Switch on Both Phones:
      • On your new Samsung Galaxy phone: During the initial setup process, you will typically be prompted to “Bring data from old device” or “Use Smart Switch.” Follow the on-screen instructions. If you’ve already set up your new phone, go to Settings > Accounts and backup > Bring data from old device (or search for “Smart Switch” in settings).
      • On your old Samsung Galaxy phone: Open the Smart Switch app. If it’s not pre-installed, download it.
    2. Select Transfer Roles:
      • On your new phone, tap “Receive data.”
      • On your old phone, tap “Send data.”
    3. Choose Wireless Connection:
      • On your new phone, select “Galaxy/Android” as the old phone type, then tap “Wireless.”
      • On your old phone, tap “Wireless” when prompted for the connection method.
    4. Connect the Devices:
      • A prompt will appear on your old phone to connect to the new device. Tap “Allow.”
      • The phones will establish a direct wireless connection.
    5. Select Data to Transfer:
      • After a quick scan, your new phone will display a list of transferable content from your old phone. You can choose:
        • “Everything”: Transfers all data.
        • “Just accounts, calls, contacts, and messages”: For a quicker, essential transfer.
        • “Custom”: Allows you to manually select specific categories (e.g., only photos, certain apps, specific settings).
      • Select your desired data.
    6. Start the Transfer:
      • Tap “Transfer” (or “Next” depending on your One UI version) at the bottom right of the screen on your new phone.
      • The transfer process will begin. This can take anywhere from a few minutes to several hours, depending on the amount of data.
      • Keep phones close and on screen: It’s a good idea to tap “Keep screen on” on both devices to prevent the connection from being interrupted by screen timeouts.
    7. Complete the Transfer:
      • Once the transfer is complete, your new phone will confirm that the data was successfully sent. Tap “Next” and then “Done.”
      • On your old phone, tap “Done.”
      • Your new Samsung Galaxy phone now has all your migrated data! You may need to log into certain apps (like banking apps) manually due to security protocols.

    Method 2: Utilizing Google Backup and Restore (Essential Data)

    Your Google Account provides a robust, cloud-based backup service for essential phone data, making it easy to restore to any new Android phone, including a Samsung Galaxy, without a direct phone-to-phone connection. This method relies on data being backed up to Google Drive.

    Before You Start:

    • Google Account Signed In: Ensure your old Samsung phone is signed into your primary Google Account.
    • Enable Google Backup: Verify that Google backup is enabled and up-to-date on your old phone.
    • Wi-Fi Connection: Both phones need a stable Wi-Fi connection.

    Step-by-Step Google Backup & Restore:

    1. Backup Your Old Samsung to Google Drive:
      • On your old Samsung Galaxy phone, go to Settings > Accounts and backup > Google Drive (or Backup data under Google Drive).
      • Ensure “Back up to Google Drive” is toggled ON.
      • Tap “Back up now” to initiate a manual backup and ensure all your latest data is saved. This includes app data, call history, contacts, device settings, messages, and Google Photos.
      • Wait for the backup to complete.
    2. Set Up Your New Samsung Galaxy Phone:
      • Power on your new Samsung Galaxy phone.
      • Follow the initial setup prompts. When you reach the “Copy apps & data” screen, select “Next.”
      • Choose “Can’t use old device?” or “A cloud backup.”
      • Sign in with the same Google Account you used to back up your old phone.
    3. Restore Data from Google Backup:
      • Your new phone will detect available backups associated with your Google Account. Select the most recent backup.
      • You’ll be given options to choose what data to restore (e.g., apps, call history, device settings, SMS messages).
      • Tap “Restore” (or “Next,” then “Restore”) to begin the process.
      • The phone will download and install your apps, restore settings, and populate contacts/messages. Photos and videos synced with Google Photos will automatically appear in the Google Photos app.

    Benefits of Google Backup:

    • Cloud-Based: Data is stored in the cloud, accessible anywhere with an internet connection.
    • Cross-Device Compatibility: Works for transferring data to any new Android phone, not just Samsung.
    • Automatic Backups: Once set up, backups occur automatically when connected to Wi-Fi, idle, and charging.

    Method 3: Leveraging Samsung Cloud (Samsung-Specific Data)

    Samsung Cloud offers another wireless backup solution, specifically for data generated by Samsung’s own apps and features (e.g., Samsung Notes, Samsung Health data, Calendar, Contacts synced to Samsung Account, Home screen layout for Samsung phones).

    Before You Start:

    • Samsung Account: Ensure both phones are signed into the same Samsung Account.
    • Enable Samsung Cloud Sync/Backup: Verify syncing and backup are enabled on your old phone.
    • Wi-Fi Connection: A stable Wi-Fi connection is recommended.

    Step-by-Step Samsung Cloud Backup & Restore:

    1. Backup Your Old Samsung to Samsung Cloud:
      • On your old Samsung Galaxy phone, go to Settings > Accounts and backup > Samsung Cloud.
      • Tap “Back up data.”
      • Select the items you wish to back up (e.g., Phone, Messages, Contacts, Calendar, Clock, Home screen, Apps, Settings, Voice Recorder).
      • Tap “Back up now.” Wait for the process to complete.
      • You can also ensure continuous syncing for certain data (like contacts, calendar, Samsung Notes) by tapping “Sync and auto back up settings” and toggling on the desired categories.
    2. Restore Data to Your New Samsung Galaxy Phone:
      • On your new Samsung Galaxy phone, during initial setup, when prompted to restore data, you can choose the option for Samsung Cloud. Sign in with your Samsung Account.
      • If you’ve already set up your new phone, go to Settings > Accounts and backup > Samsung Cloud.
      • Tap “Restore data.”
      • Select the most recent backup from your old device.
      • Choose the types of data you want to restore.
      • Tap “Restore” (or “Sync”) to begin downloading your data.

    Benefits of Samsung Cloud:

    • Deep Samsung Integration: Ideal for transferring Samsung-specific data and settings that Google Backup might not cover (like custom home screen layouts from One UI).
    • Convenience for Samsung Ecosystem Users: Seamless integration if you primarily use Samsung services and apps.

    Method 4: Individual Wireless Transfers (For Specific Files)

    For smaller, specific data transfers like a few photos, videos, or contacts, you can use built-in Android sharing features.

    1. Share Using Nearby Share (Android’s AirDrop):
      • Nearby Share allows fast, direct file transfer between Android devices (and some Chromebooks) without an internet connection.
      • On both phones: Ensure Bluetooth and Location are ON.
      • On old phone: Select the photos, videos, or files you want to share from your Gallery or Files app. Tap the “Share” icon.
      • Tap “Nearby Share.”
      • Your new phone should appear in the list of nearby devices. Tap its name.
      • On new phone: Accept the incoming files.
    2. Share Contacts via Bluetooth:
      • On your old phone, open the Contacts app.
      • Select the contact(s) you wish to transfer.
      • Tap “Share.”
      • Choose “Bluetooth.”
      • Select your new phone from the list of paired or available Bluetooth devices.
      • On your new phone, accept the incoming contact file (usually a .vcf file).

    Conclusion

    Transferring data wirelessly from your old Samsung Galaxy to your new one is a straightforward process, thanks to well-integrated tools and cloud services. For the most comprehensive transfer, Samsung Smart Switch is your best bet, moving nearly everything over with minimal effort. For essential data synced to the cloud, Google Backup provides universal Android compatibility, while Samsung Cloud offers deeper integration for Samsung-specific content. By choosing the method that aligns with your needs, you can quickly get your new Samsung Galaxy phone ready for use, feeling just like home from the moment you power it on.

    FAQ Section

    Q1: What is the fastest way to transfer all data from an old Samsung to a new one wirelessly?

    The fastest and most comprehensive way to transfer all data wirelessly from an old Samsung to a new one is by using Samsung Smart Switch. It utilizes Wi-Fi Direct for high-speed local transfer of contacts, messages, photos, videos, apps, settings, and more.

    Q2: Can I transfer app data (like game progress) wirelessly with Smart Switch?

    Samsung Smart Switch attempts to transfer app data, including settings and some game progress, especially for apps installed from the Google Play Store. However, whether specific app data or game progress transfers successfully also depends on how the individual app is designed (e.g., if the app itself stores data on a cloud server). For critical game progress, always check if the game has its own in-app cloud save feature.

    Q3: Do I need a Wi-Fi connection for Samsung Smart Switch’s wireless transfer?

    While Samsung Smart Switch can create its own direct wireless connection (Wi-Fi Direct) between the two phones, having both devices connected to the same stable Wi-Fi network can often result in a faster and more reliable transfer, especially for very large amounts of data.

    Q4: What data is backed up to Google Drive from my Samsung phone?

    Google Drive backup (via Google One) typically backs up essential phone data like app data, call history, contacts, device settings, SMS messages, and photos/videos (to Google Photos). This backup is associated with your Google Account and can be restored to any Android device during its initial setup.

    Q5: Can I transfer data from a non-Samsung Android phone to a new Samsung Galaxy wirelessly?

    Yes. Samsung Smart Switch is designed to transfer data from other Android devices (including non-Samsung phones running Android 4.3 or higher) to a new Samsung Galaxy phone wirelessly. The steps are largely similar to transferring between two Samsung phones, though the exact types of data transferable might vary slightly depending on the old phone’s brand and Android version.

  • How to Use Samsung DeX on Your PC or Monitor

    How to Use Samsung DeX on Your PC or Monitor

    Samsung DeX (short for “Desktop eXperience”) is an innovative feature that allows you to transform your compatible Samsung Galaxy smartphone or tablet into a full-fledged desktop computing environment. Instead of just mirroring your phone’s screen, DeX provides a familiar desktop interface complete with a taskbar, resizable windows, drag-and-drop functionality, and support for external peripherals like a keyboard and mouse. This capability makes your mobile device a versatile tool for productivity, entertainment, and even light work, bridging the gap between mobile and traditional computing.

    First introduced with the Galaxy S8 in 2017, Samsung DeX has evolved significantly. Initially requiring a dedicated docking station (DeX Station or DeX Pad), it later gained support for simple USB-C to HDMI adapters and, more recently, wireless connectivity to monitors, TVs, and even Windows PCs. This continuous development reflects Samsung’s vision of a converged computing experience, allowing users to leverage the power of their mobile device on a larger screen.

    Understanding Samsung DeX Modes and Requirements

    Samsung DeX offers various ways to connect, each with its own requirements.

    DeX Compatible Devices:

    Samsung DeX is available on most high-end Samsung Galaxy smartphones and tablets. This includes:

    • Smartphones: Galaxy S series (S8, S9, S10, S20, S21, S22, S23, S24 series, and newer), Galaxy Note series (Note 8, Note 9, Note 10, Note 20 series, and newer), Galaxy Z Fold series (Fold, Z Fold2, Z Fold3, and newer), and some A-series like A90 5G.
    • Tablets: Galaxy Tab S series (Tab S4, S5e, S6, S7, S8, S9 series, and newer), and certain Tab Active models.
    • Note: Compatibility may vary by specific model and software updates (One UI version). Check Samsung’s official website for the most up-to-date list.

    DeX Modes of Connection:

    1. Wired Connection to a Monitor/TV: The classic way to use DeX, connecting directly to an external display.
      • Requirements:
        • Compatible Samsung Galaxy phone/tablet.
        • HDMI Adapter/Cable: A USB-C to HDMI adapter or a direct USB-C to HDMI cable. Genuine Samsung adapters (like the DeX Pad or DeX Station, now largely superseded by simpler cables/adapters) are recommended, but many third-party USB-C hubs with HDMI output also work.
        • Monitor/TV with HDMI input: Most modern displays will work.
        • Optional Peripherals: Bluetooth or USB keyboard and mouse for a full desktop experience.
    2. Wireless Connection to a Monitor/TV: For a cable-free setup.
      • Requirements:
        • Compatible Samsung Galaxy phone/tablet (Galaxy Note 20 series, S20 series, S21 series, and newer, along with compatible tablets like Tab S7/S8 series and newer).
        • Miracast-enabled TV or Monitor: Most Samsung Smart TVs launched after 2019 support Miracast. Other smart TVs or external Miracast dongles (like Microsoft Wireless Display Adapter) may also work, but performance isn’t guaranteed.
        • Stable Wi-Fi Network: Both your phone and the display should be on the same, stable Wi-Fi network, preferably 5 GHz for optimal performance.
        • Optional Peripherals: Bluetooth keyboard and mouse.
    3. Wired Connection to a PC (DeX for PC App): Use your phone as a second screen for your Windows computer.
      • Requirements:
        • Compatible Samsung Galaxy phone (Galaxy S9, Note 9, Fold, S10, Note 10, S20, Note 20, S21, S22, S23, S24 series, and newer). Tablets generally do not support DeX for PC.
        • Windows PC: Running Windows 10 (32/64 bit) or above. (macOS support ended in early 2022).
        • Samsung DeX for PC Application: Download and install the application from the official Samsung DeX website.
        • USB-C Cable: A standard USB-C to USB-C cable (or USB-C to USB-A if your PC only has USB-A ports).
      • PC System Requirements (Recommended):
        • OS: Windows 10 (32/64 bit)
        • CPU: Intel Core i5 2.5 GHz or higher
        • RAM: 8GB
        • Hard Disk Space: At least 500MB
        • USB: 1 free USB 3.0 port
    4. Standalone DeX on Tablet: Some Samsung Galaxy tablets can run DeX directly on their own screen, effectively turning the tablet’s UI into a desktop interface without needing an external display.
      • Requirements:
        • Compatible Samsung Galaxy tablet (Tab S4, S5e, S6, S7, S8, S9 series, etc.).
        • Optional: Book Cover Keyboard or external Bluetooth keyboard and mouse.

    How to Use Samsung DeX: Step-by-Step Guide

    The process varies slightly depending on your chosen connection method.

    Method 1: Wired Connection to an External Monitor/TV

    This is the most stable and widely supported method.

    1. Connect Your Phone to the Monitor:
      • Plug one end of your USB-C to HDMI adapter or USB-C to HDMI cable into your Samsung Galaxy phone’s USB-C port.
      • Plug the HDMI end into an available HDMI input on your monitor or TV.
    2. Connect Peripherals (Optional but Recommended):
      • If your adapter/hub has USB ports, connect a wired keyboard and mouse.
      • Alternatively, pair Bluetooth keyboard and mouse with your phone via your phone’s Bluetooth settings (Settings > Connected devices > Bluetooth).
    3. Activate DeX:
      • Once connected, your phone may automatically display a prompt to “Start Samsung DeX.” Tap Start now.
      • If it doesn’t automatically prompt, swipe down on your phone’s screen to open the Quick Settings panel, and tap the DeX icon (it looks like a monitor).
      • If your TV is only screen mirroring your phone, tap the Samsung DeX notification in the notification panel and then tap Start now to switch to DeX mode.
    4. Explore the DeX Interface:
      • Your monitor will now display the Samsung DeX desktop environment.
      • You’ll see a taskbar at the bottom, an app drawer icon in the bottom-left corner, and notifications/quick settings in the bottom-right.
      • Use your connected mouse and keyboard to navigate, open apps, resize windows, and multitask just like on a regular computer.
    5. Using Your Phone as a Touchpad/Keyboard (Optional):
      • While in DeX mode, your phone’s screen can act as a touchpad or virtual keyboard. Swipe down your phone’s notification panel and tap the “Use your phone as a touchpad” notification. This is useful if you don’t have external peripherals.
    6. Exiting DeX:
      • To exit DeX mode, click the Apps icon (usually a square grid) in the bottom-left corner of the DeX desktop.
      • Click Exit DeX.
      • Alternatively, simply unplug the USB-C to HDMI cable from your phone.

    Method 2: Wireless Connection to a Smart TV or Monitor (Miracast)

    This method provides convenience without cables, but may have slightly higher latency depending on your Wi-Fi environment.

    1. Ensure Compatibility: Make sure your Samsung Galaxy phone (Note 20 series, S20 series, S21 series, or newer) and your TV/monitor support Wireless DeX (Miracast). Samsung Smart TVs from 2019 onwards are generally compatible.
    2. Enable DeX on Your Phone:
      • Swipe down from the top of your phone’s screen to open the Quick Settings panel.
      • Tap the DeX icon.
    3. Select “DeX on TV or monitor”:
      • If prompted, choose DeX on TV or monitor. (If “DeX on PC” appears, select “More options” at the top right and then “Switch to TV or monitor.”)
    4. Choose Your Display:
      • Your phone will scan for available Miracast-enabled TVs or monitors. Select your desired display from the list.
    5. Accept Connection:
      • A prompt will appear on your TV/monitor asking you to allow the connection. Use your TV remote to Allow or Accept.
    6. Explore and Control:
      • The DeX desktop will appear on your TV. Your phone’s screen will automatically switch to a touchpad interface, allowing you to control the cursor and interact with the DeX environment.
      • Connect a Bluetooth keyboard and mouse for a more traditional setup.
    7. Exiting Wireless DeX:
      • On your phone, swipe down the notification panel and tap the DeX notification.
      • Tap End DeX or Disconnect.

    Method 3: Wired Connection to a PC (Using Samsung DeX for PC App)

    This lets you run DeX as an application window on your Windows desktop.

    1. Download and Install DeX for PC:
      • On your Windows computer, go to
      • Download the Samsung DeX for PC application compatible with your Windows OS.
      • Run the installer and follow the on-screen instructions to complete the installation.
    2. Open DeX for PC App: Launch the Samsung DeX application on your computer.
    3. Connect Your Phone to PC:
      • Use a USB-C cable to connect your Samsung Galaxy phone to your PC’s USB port.
    4. Activate DeX on Phone:
      • On your phone, a notification or prompt might appear to “Start Samsung DeX.” Tap Start now.
      • If not, swipe down on your phone’s screen to open the Quick Settings panel and tap the DeX icon. Select “DeX on PC.”
    5. Accept Connection on PC:
      • Your PC might show a prompt to accept the connection. Click Allow or Connect.
    6. Use DeX as a Window:
      • The Samsung DeX desktop will now appear as a resizable window on your Windows PC.
      • You can use your computer’s mouse and keyboard to control the DeX environment.
      • This mode allows for seamless drag-and-drop of files between your phone’s DeX window and your PC’s desktop, and easy copy-pasting of text.
    7. Exiting DeX for PC:
      • Simply close the Samsung DeX application window on your PC, or click the Apps icon in the DeX window and choose Exit DeX.
      • You can also unplug the USB cable from your phone.

    Method 4: Standalone DeX on a Samsung Galaxy Tablet

    For select tablets, you can activate DeX mode directly on the tablet’s screen.

    1. Access Quick Settings: Swipe down twice from the top of your tablet’s screen to fully expand the Quick Settings panel.
    2. Tap the DeX Icon: Locate and tap the DeX icon (it looks like a monitor).
    3. DeX Activation: The tablet’s interface will switch from its regular One UI to the DeX desktop environment.
    4. Connect Peripherals (Optional): If you have a Samsung Book Cover Keyboard, simply attach it. You can also connect Bluetooth keyboards and mice for a more laptop-like experience.
    5. Exiting Standalone DeX: Tap the Apps icon in the bottom-left corner of the DeX screen, then tap Exit DeX.

    Features and Limitations of Samsung DeX

    Key Features:

    • Desktop-like UI: Familiar taskbar, multi-window support, system tray.
    • Multi-App Support: Run multiple Android apps simultaneously in resizable windows.
    • Peripheral Compatibility: Use external keyboards, mice, and even gaming controllers.
    • Drag-and-Drop: Seamlessly move files between apps within DeX, or between DeX and your PC (in DeX for PC mode).
    • Optimized Apps: Many Samsung and Google apps (e.g., Chrome, Gmail, Microsoft Office Suite) are optimized for the DeX environment, behaving more like their desktop counterparts.
    • Phone Usability: Your phone can still be used independently while DeX is active on an external display (in most modes), or act as a touchpad/keyboard.

    Limitations:

    • App Compatibility: Not all Android apps are fully optimized for DeX. Some might open in fixed-size phone windows, or not launch at all.
    • Performance: While generally smooth, demanding applications or extensive multitasking can occasionally lead to minor slowdowns, especially on older devices.
    • Resolution: While DeX supports resolutions up to WQHD (2560×1440), 4K resolution is not universally supported.
    • Gaming: Most mobile games are not optimized for a desktop interface and may not play well with keyboard and mouse input or in a windowed mode.
    • Windows/macOS Software: DeX runs Android apps, not Windows or macOS software. It’s not a full PC replacement in that sense.
    • Wireless Latency: Wireless DeX can sometimes experience slight input lag or visual stuttering, depending on Wi-Fi quality and display compatibility.

    Samsung DeX is a powerful tool for extending your mobile experience to a larger screen, offering a compelling desktop-like environment for productivity and convenience. By understanding the different connection methods and their requirements, you can effectively leverage your Samsung Galaxy device’s full potential.

    FAQ (Frequently Asked Questions)

    Q1: What is Samsung DeX?

    Samsung DeX (Desktop eXperience) is a software platform on compatible Samsung Galaxy smartphones and tablets that transforms your mobile device into a desktop computing environment when connected to an external display (monitor, TV) or a PC. It provides a familiar desktop interface with a taskbar, resizable windows, and support for external peripherals.

    Q2: Which Samsung Galaxy devices support DeX?

    Samsung DeX is supported on most high-end Samsung Galaxy smartphones (e.g., S series from S8 onwards, Note series from Note 8 onwards, Z Fold series) and tablets (e.g., Tab S series from Tab S4 onwards). Specific compatibility might vary by model and One UI version. It’s always best to check Samsung’s official product specifications for your device.

    Q3: Do I need a special dock to use Samsung DeX?

    Not anymore. While earlier versions of DeX required a dedicated DeX Station or DeX Pad, modern Samsung devices can use DeX with:

    • A simple USB-C to HDMI adapter or cable for wired connections to monitors/TVs.
    • Wirelessly to Miracast-enabled TVs/monitors or Windows PCs (with the DeX for PC app).
    • Certain tablets can even run DeX directly on their own screen (Standalone DeX).

    Q4: Can I use DeX wirelessly?

    Yes, Wireless DeX is available on newer Samsung Galaxy devices (e.g., S20 series, Note 20 series, S21 series and newer, and compatible tablets). You can connect wirelessly to Miracast-enabled TVs or monitors. For wireless connection to a PC, you’ll need the Samsung DeX for PC app installed on your Windows computer and a compatible phone.

    Q5: Can I use my phone’s screen as a mouse or keyboard in DeX mode?

    Yes, when your phone is connected to an external display via DeX, its screen can automatically transform into a virtual touchpad for cursor control and an on-screen keyboard. This is a great option if you don’t have external peripherals.

    Q6: What are the main advantages of using Samsung DeX over just screen mirroring?

    Screen mirroring simply duplicates your phone’s display onto a larger screen. Samsung DeX, however, provides a true desktop experience:

    • Dedicated desktop interface: Not just a stretched phone screen.
    • Multi-window multitasking: Open and manage multiple apps in resizable windows.
    • Optimized apps: Many apps (especially productivity suites) behave more like their desktop versions.
    • Independent phone use: In most DeX modes, you can continue to use your phone independently for calls, messages, etc., while DeX is active on the external display.

    Q7: Can I run Windows or macOS applications using Samsung DeX?

    No, Samsung DeX runs Android applications in a desktop environment. It does not allow you to run native Windows or macOS software. It’s an extension of your Android device, not a full-fledged PC replacement in that regard.

    Q8: What are the minimum PC requirements for Samsung DeX for PC?

    For Samsung DeX for PC, your Windows computer should ideally meet these minimum requirements:

    • OS: Windows 10 (32/64 bit).
    • CPU: Intel Core i3 2.4 GHz processor or higher (i5 2.5 GHz or higher recommended).
    • RAM: 4GB (8GB recommended).
    • Hard Disk Space: At least 500MB free.
    • USB: 1 free USB 2.0 port (USB 3.0 recommended).
  • How to Change Samsung keyboard Settings

    How to Change Samsung keyboard Settings

    The Samsung Keyboard is the default virtual keyboard on your Samsung Galaxy phone, and it’s a powerful tool that you interact with almost constantly. From sending messages to typing emails, its performance and features significantly impact your daily smartphone experience. While it works great out of the box, you can customize almost every aspect of the Samsung Keyboard to perfectly suit your typing style, preferred language, and even aesthetic preferences.

    Optimizing your keyboard settings can lead to faster typing, fewer errors, and a more comfortable user experience. Whether you want to switch languages, enable smarter predictive text, or simply change its look, this guide will show you how to master your Samsung Keyboard settings.

    Accessing Samsung Keyboard Settings

    There are a couple of straightforward ways to get to the Samsung Keyboard settings:

    Method 1: Through the Keyboard Itself (Quick Access)

    1. Open any app that requires text input to make the keyboard appear.
    2. Tap the Gear icon (⚙️) on the keyboard toolbar.

    Method 2: Through Your Phone’s Main Settings

    1. Go to Settings > General management.
    2. Tap Samsung Keyboard settings (or Keyboard list and default > Samsung Keyboard on older devices).

    Key Samsung Keyboard Settings to Customize

    1. Languages and Types
    • Add/Remove Languages: Settings > Languages and types > Manage input languages. Toggle languages on/off.
    • Switch Languages: Tap the globe icon or swipe the spacebar.
    • Change Layout: Tap the language > choose QWERTY, 3×4, floating, etc.
    1. Predictive Text and Autocorrect
    • Toggle Predictive Text: Settings > Predictive text.
    • Auto Replace: Turn on/off to control autocorrect behavior.
    • Personalized Predictions: Learn from your usage.
    • Clear Data: Reset predictive text suggestions.
    • Text Shortcuts: Create custom input expansions (e.g., “omw” > “On my way!”).
    1. Keyboard Toolbar and Modes
    • Toolbar: Toggle toolbar visibility and edit shortcuts.
    • Modes: Choose from standard, one-handed, floating, or split keyboard.
    1. Size and Transparency
    • Adjust keyboard height and background transparency.
    • Drag handles to resize or tap Reset to default.
    1. Keyboard Layout and Feedback
    • Layout: Enable number row or alternative characters.
    • Feedback: Toggle sound/vibration and set intensity. Enable/disable character previews.
    1. Themes (Visual Customization)
    • Change Theme: Choose light, dark, solid, or high contrast.
    • Advanced Customization: Use the Good Lock app and KeysCafe module (if available).
    1. Swipe, Touch, and Feedback
    • Swipe Controls: Enable swipe typing or spacebar cursor control.
    • Touch Feedback: Customize sound and vibration responses.
    1. Reset to Default Settings
    • Settings > Reset to default settings > Reset keyboard settings.

    Frequently Asked Questions (FAQ)

    Q1: How do I change my default keyboard on a Samsung phone?

    • Go to Settings > General management > Keyboard list and default > Default keyboard > choose your preferred keyboard.

    Q2: Predictive text isn’t working. What should I check?

    • Ensure it’s turned on under Samsung Keyboard settings > Predictive text.
    • Try clearing the Samsung Keyboard cache under Settings > Apps > Samsung Keyboard > Storage > Clear cache.

    Q3: Where are the emojis and stickers?

    • Tap the emoji icon on the keyboard toolbar or near the spacebar.
    • Stickers and GIFs are found in tabs within the emoji panel.

    Q4: Can I resize the keyboard?

    • Yes. Settings > Samsung Keyboard settings > Size and transparency.

    Q5: How do I disable typing vibration?

    • Settings > Samsung Keyboard settings > Swipe, touch, and feedback > Touch feedback > toggle off Vibration.
  • How to Enable Call Recording in Samsung S24 Ultra Without Third-Party App

    How to Enable Call Recording in Samsung S24 Ultra Without Third-Party App

    Call recording can be an incredibly useful feature for various reasons: to remember important details from a conversation, to keep a record of agreements, or for personal security. Many users prefer to avoid third-party apps for call recording due to concerns about privacy, app permissions, battery drain, or simply the desire for a seamless, integrated experience.

    Fortunately, Samsung Galaxy S24 Ultra devices, running on One UI (Samsung’s custom Android skin), often include a built-in call recording feature within the native Phone app. This means you don’t need to download any additional applications from the Google Play Store. However, the availability of this feature is highly dependent on the region where your phone was purchased and the local laws regarding call recording. Due to privacy regulations, Samsung disables this feature in certain countries (e.g., many European Union countries, some parts of the US) where “all-party consent” is required for recording conversations. In regions like India, where “one-party consent” or other regulations apply, the feature is typically available.

    Legal Considerations for Call Recording: Before you proceed with recording calls, it’s crucial to understand the legalities in your specific region. Laws vary significantly:

    • One-Party Consent: In some regions (e.g., India, many US states), it’s legal to record a conversation as long as one party to the conversation (which can be you) is aware of and consents to the recording.
    • All-Party Consent: In other regions (e.g., some US states, most EU countries, UK for business purposes), all parties involved in the conversation must be notified and give their consent before the call can be legally recorded. Failing to do so can have legal consequences.

    Always check your local laws to ensure compliance. When in doubt, it’s best practice to inform the other party that the call is being recorded.

    How to Enable Call Recording on Your Samsung S24 Ultra

    The built-in call recording feature on the Samsung S24 Ultra is found within the Dialer (Phone) application. There are two primary ways to record calls: automatically or manually.

    Method 1: Enabling Automatic Call Recording

    This method sets your phone to record all calls, calls from unsaved numbers, or calls from specific contacts automatically.

    Step 1: Open the Phone App

    • Action: Tap on the Phone icon (the green icon with a phone receiver) from your home screen or app drawer to open the dialer.

    Step 2: Access Call Settings

    • Action: In the Phone app, tap the three vertical dots (More options menu) in the top-right corner of the screen.
    • From the dropdown menu, tap “Settings.”

    Step 3: Navigate to Record Calls

    • Action: In the Call settings menu, scroll down and look for “Record calls.” Tap on it.

    Step 4: Configure Auto Record Calls

    • Action:
      1. Toggle the “Auto record calls” switch to the “On” position (it will turn blue/green).
      2. Once enabled, tap on “Auto record calls” again to see more options:
        • All calls: This option will record every incoming and outgoing call automatically.
        • Calls with unsaved numbers: Only calls from numbers not in your contact list will be recorded.
        • Calls with specific numbers: This allows you to manually add or select contacts whose calls you wish to record automatically. Tap “Numbers to auto record” to manage this list.
    • Confirmation: Once you select your preferred option, your S24 Ultra will automatically start recording calls based on your setting.

    Method 2: Manually Recording a Call During a Conversation

    If you prefer to record calls on a case-by-case basis, you can initiate recording during an active call.

    Step 1: Make or Receive a Call

    • Action: Initiate an outgoing call or answer an incoming call on your Samsung S24 Ultra.

    Step 2: Locate the Record Button

    • Action: Once the call is active and connected, look for a “Record” button or icon on the active call screen. This is typically represented by a microphone icon or a simple “Record” text button.
      • Note: In some One UI versions or depending on your region, you might need to tap the three vertical dots (More options menu) during the active call to reveal the “Record call” option in a dropdown menu.

    Step 3: Start Recording

    • Action: Tap the “Record” button or select “Record call” from the menu.
      • Your phone might play a brief audible announcement to both parties indicating that the call is being recorded. This is a common feature in many regions to comply with consent laws.
      • You’ll typically see a red dot or a timer on the screen indicating that the recording is in progress.

    Step 4: Stop Recording

    • Action: To stop recording, tap the “Record” button again (which may now say “Stop”) or select the option from the three-dot menu.
    • The recording will also automatically stop when the call ends.

    Where to Find Your Recorded Calls

    Once recorded, your calls are saved directly on your Samsung S24 Ultra’s internal storage.

    • Via the Phone App:
      1. Open the Phone app.
      2. Tap the three vertical dots (More options menu) in the top-right corner.
      3. Tap “Settings.”
      4. Tap “Record calls.”
      5. Tap “Recorded calls.” You will see a list of all your recordings, often sorted by date, with the contact name or phone number.
    • Via My Files App:
      1. Open the “My Files” app (Samsung’s file manager).
      2. Navigate to Internal storage > Recordings > Call (or sometimes just “Call”). You’ll find your audio files here, usually in .m4a or .amr format.

    Troubleshooting Call Recording Availability

    If you don’t see the “Record calls” option in your Phone app settings:

    • Region Restrictions: The most likely reason is that the feature is disabled in your region due to legal regulations. There is generally no official way to enable it without changing your phone’s CSC (Country Specific Code) which is complex, risky, and may void your warranty.
    • Software Updates: Ensure your S24 Ultra is running the latest One UI and Android software updates. While unlikely to add the feature if it’s regionally disabled, updates can sometimes improve existing functionality.
    • Carrier Restrictions: In rare cases, some carriers might override Samsung’s settings to disable the feature even if the region generally allows it.

    Frequently Asked Questions (FAQ)

    Q1: Why can’t I find the “Record calls” option on my Samsung S24 Ultra?

    The most common reason is regional legal restrictions. Samsung disables the built-in call recording feature in countries where call recording laws require all-party consent or are otherwise stricter. This is a software restriction based on your phone’s country variant (CSC code).

    Q2: Will the other person know if I’m recording the call on my S24 Ultra?

    In many regions where the built-in call recording feature is enabled, Samsung includes an audible announcement at the beginning of the recording that informs both parties that the call is being recorded. This is to help users comply with “all-party consent” laws. However, this audible announcement’s presence can vary by region and specific One UI version.

    Q3: Where are my recorded calls saved on the S24 Ultra?

    Your recorded calls are saved in your phone’s internal storage. You can access them through the Phone app (Phone > three dots > Settings > Record calls > Recorded calls) or by navigating to My Files > Internal storage > Recordings > Call.

    Q4: Can I auto-record calls from specific numbers only?

    Yes. Once you enable “Auto record calls” in the Phone app settings, you’ll see options to record “All calls,” “Calls with unsaved numbers,” or “Calls with specific numbers.” You can then manually select contacts to include in the “specific numbers” list.

    Q5: Is it legal to record phone calls in India/US/UK on my Samsung S24 Ultra? A5:

    • India: Generally, India follows a one-party consent rule, meaning you can record a conversation if you are a participant, even without informing the other party. However, using such recordings for malicious purposes can lead to legal liability.
    • US: Call recording laws in the US vary by state. Some states require one-party consent, while others require all-party consent. Federal law requires one-party consent. You must abide by the laws of the state where the call is being recorded.
    • UK: For personal use, one-party consent is generally allowed, but sharing the recording without the consent of others is illegal. For businesses, strict rules under UK GDPR require explicit consent from all parties and a legitimate reason for recording. Always verify the current laws in your specific jurisdiction before recording calls.

    Q6: Does using the built-in call recorder affect my phone’s performance or battery life?

    No, the built-in call recording feature is highly optimized by Samsung and integrated into the system. It has a minimal impact on your phone’s performance and battery life compared to third-party call recording applications, which may consume more resources in the background.

  • How to Optimize Battery for Gaming on Samsung

    How to Optimize Battery for Gaming on Samsung

    Gaming on your Samsung phone can be a significant drain on your battery. To ensure you get the most out of your playtime without constantly searching for a charger, it’s crucial to optimize your device’s settings. This guide will walk you through the most effective ways to save battery life while gaming on your Samsung Galaxy smartphone.

    Step 1: Utilize Samsung’s Game Booster for Power Saving

    Game Booster is Samsung’s built-in tool, part of the Game Launcher, designed to manage your phone’s resources specifically for gaming. It offers dedicated modes that can prioritize battery life.

    1. Enable Game Launcher:
      • Go to Settings > Advanced features.
      • Tap on Game Launcher and ensure the toggle is turned On.
      • This will create a “Game Launcher” app icon on your home screen or in your app drawer, acting as a hub for all your games.
    2. Add Your Games to Game Launcher:
      • Open the Game Launcher app.
      • Your games should automatically appear. If not, tap the three horizontal lines (or three dots) menu icon, then Add apps to manually select your games.
    3. Access Game Booster Settings:
      • In the Game Launcher app, tap the three horizontal lines (or three dots) menu icon in the bottom right (or top right on older versions).
      • Tap on Game Booster.
    4. Configure Game Optimization:
      • Inside Game Booster settings, look for “Game optimization” or “Game performance.”
      • You will typically see three main options:
        • Focus on performance: Maximizes gaming performance (higher FPS, better graphics) but drains battery faster.
        • Standard: Provides a balanced experience between performance and battery life.
        • Focus on power saving / Battery saver: Limits performance (e.g., lower FPS, reduced graphics quality) to significantly extend battery life. This is your primary setting for battery optimization.
      • Select Focus on power saving / Battery saver.
      • Note: The exact names and availability of these modes may vary slightly depending on your Samsung Galaxy model and One UI version.
    5. Adjust Advanced Game Booster Settings (Optional):
      • Within Game Booster, you might find “Labs” or “Advanced game settings.”
      • “Alternate game performance management”: If available, enabling this can sometimes offer a more stable performance profile for battery efficiency.
      • “Pause USB PD charging when gaming”: (Available on newer, high-end Samsung phones with 25W+ PD chargers supporting PPS). This feature allows your phone to bypass battery charging and directly power the device when gaming while plugged in (if battery is above 20%). This reduces heat and prolongs battery health, indirectly helping with overall battery longevity.

    Step 2: Adjust In-Game Graphics and Frame Rate Settings

    Many modern mobile games offer their own in-game graphics settings. Lowering these can significantly reduce battery consumption.

    1. Open Game Settings: Launch the game you want to play.
    2. Navigate to Graphics/Video Settings: Look for a “Settings” or “Options” menu within the game itself, then find the “Graphics,” “Display,” or “Video” settings.
    3. Lower Key Settings:
      • Resolution: Reduce the in-game resolution. Playing at 720p instead of 1080p or higher can make a big difference.
      • Graphics Quality: Choose “Low” or “Medium” instead of “High” or “Ultra” for settings like textures, shadows, and anti-aliasing.
      • Frame Rate (FPS) Limit: If the game offers an FPS cap (e.g., 30 FPS, 60 FPS), choose a lower, stable frame rate. Your phone won’t have to work as hard to maintain a very high FPS. While 120Hz refresh rates are great for smoothness, a capped 60 FPS or even 30 FPS at lower graphic settings will significantly save battery.

    Step 3: Optimize General Phone Settings for Battery Life

    Beyond Game Booster, several general Samsung phone settings impact battery drain that you should adjust before a gaming session.

    1. Reduce Screen Brightness: The screen is one of the biggest battery consumers.
      • Manual Adjustment: Swipe down the Quick Panel and manually lower the brightness slider before playing.
      • Disable Adaptive Brightness: Go to Settings > Display > Adaptive brightness and turn it off for more control.
    2. Lower Screen Refresh Rate (if applicable):
      • Many Samsung flagship phones have high refresh rate displays (e.g., 90Hz, 120Hz). While great for smoothness, they consume more power.
      • Go to Settings > Display > Motion smoothness.
      • Choose “Standard” (60Hz) instead of “Adaptive” or “High.”
    3. Enable Dark Mode (for AMOLED screens):
      • If your Samsung phone has an AMOLED display (most mid-range to high-end models), using Dark Mode helps save battery because black pixels are essentially turned off.
      • Go to Settings > Display > Dark mode settings.
      • Ensure Dark Mode is applied system-wide and to supported apps.
    4. Disable Unnecessary Connectivity:
      • Turn off Bluetooth: If not using wireless headphones or controllers.
      • Turn off GPS/Location Services: If the game doesn’t require precise location tracking. Go to Settings > Location and toggle it off.
      • Use Wi-Fi instead of Mobile Data: Wi-Fi is generally more power-efficient than cellular data (4G/5G), especially if the cellular signal is weak.
    5. Close Background Apps:
      • Before launching a game, clear all recent apps from your multitasking screen. Background apps consume RAM and CPU cycles, contributing to battery drain.
      • Samsung’s Device Care can help: Settings > Battery and device care > Optimize now.
    6. Limit Background Usage for Non-Gaming Apps:
      • Go to Settings > Battery and device care > Battery > Background usage limits.
      • Put rarely used apps into “Sleeping apps” or “Deep sleeping apps.” This prevents them from running in the background and consuming power.

    Step 4: Physical and Charging Habits

    Beyond software settings, how you manage your phone’s physical state and charging habits can also impact gaming battery life.

    • Avoid Overheating: High temperatures significantly degrade battery health and can cause your phone to throttle performance to prevent damage.
      • Avoid gaming in direct sunlight.
      • Remove your phone case while gaming, especially if it’s thick or non-breathable.
      • Consider using an external phone cooler or simply taking breaks.
    • Don’t Game While Charging (if possible):
      • Gaming while charging generates a lot of heat, which is detrimental to your battery’s long-term health. If you must charge, enable “Pause USB PD charging when gaming” (if available) or use a slower charger to reduce heat.
    • Charge Optimally:
      • Avoid constantly fully discharging or fully charging your battery. Keeping your battery between 20% and 80% generally prolongs its lifespan.
      • Utilize Samsung’s “Protect battery” feature (if available on your device via Settings > Battery and device care > Battery > More battery settings) which limits charging to 85%.

    By combining these software adjustments and healthy charging practices, you can significantly extend your gaming sessions on your Samsung phone and maintain your battery’s health over time.

    FAQ: How to Optimize Battery for Gaming on Samsung

    Q1: What is Game Booster and how does it help save battery for gaming? A1: Game Booster is a feature within Samsung’s Game Launcher that optimizes phone resources for gaming. It helps save battery by allowing you to choose a “Focus on power saving” mode, which limits performance (like FPS and graphics quality) to reduce power consumption during gameplay. It can also manage background apps and network usage.

    Q2: Should I turn on “Power saving mode” from Quick Panel when gaming? A2: While the general “Power saving mode” can save battery, it often applies aggressive restrictions system-wide that might severely impact your gaming performance (e.g., lower CPU speed, reduced refresh rate). It’s generally better to use Game Booster’s “Focus on power saving” option, as it’s specifically designed to balance gaming and battery life more intelligently.

    Q3: Does reducing the screen refresh rate really save battery while gaming? A3: Yes, absolutely. High refresh rate displays (like 120Hz) consume significantly more power to draw smoother animations. By switching your Samsung phone’s refresh rate to “Standard” (60Hz) in Settings > Display > Motion smoothness, you reduce the workload on your GPU and display, leading to substantial battery savings, especially during graphics-intensive games.

    Q4: Is it bad for my battery to game while charging? A4: Gaming while charging generates a lot of heat, and sustained high temperatures are detrimental to your phone battery’s long-term health and lifespan. While modern batteries have safeguards, consistently exposing them to high heat can accelerate degradation. If you must game while charging, try to keep the phone cool (e.g., remove case, use a fan) or utilize the “Pause USB PD charging when gaming” feature if your device supports it.

    Q5: How can I prevent my Samsung phone from overheating during long gaming sessions? A5: To prevent overheating and save battery during long gaming sessions:

    • Remove your phone case.
    • Lower in-game graphics settings.
    • Reduce screen brightness.
    • Avoid playing in direct sunlight or hot environments.
    • Take short breaks.
    • If available, enable “Pause USB PD charging when gaming” when plugged in.
    • Consider using an external phone cooling fan.
  • How to Downgrade from Windows 11 to Windows 10

    How to Downgrade from Windows 11 to Windows 10

    Upgrading to Windows 11 might have seemed like a great idea at first, with its fresh new interface and features. However, for various reasons—such as software incompatibility, driver issues, or simply a preference for the familiar Windows 10 environment—many users find themselves wanting to downgrade back to the previous operating system.

    The good news is that Microsoft provides pathways to revert from Windows 11 to Windows 10. The method you choose largely depends on how long it has been since you upgraded. It’s a common query on forums and support sites, with many users encountering performance issues or finding that their essential applications don’t run as smoothly on the newer OS.

    Before You Begin: Essential Preparations

    Regardless of the method you choose, data backup is the single most critical step. Downgrading an operating system, especially a clean install, can lead to data loss.

    • Back Up All Important Data: Use an external hard drive, USB flash drive, or cloud storage service (like OneDrive, Google Drive, or Dropbox) to back up all your personal files, documents, photos, videos, and any other data you cannot afford to lose. This includes files from your Desktop, Documents, Pictures, Videos, and Downloads folders.
    • Note Down Software Licenses: If you have any paid software, make sure you have their product keys or activation details handy, as you will likely need to reinstall them and reactivate them on Windows 10.
    • Check Hardware Compatibility (for Windows 10): While your system ran Windows 10 before, it’s good practice to ensure all your hardware has Windows 10 drivers available, especially if you have newer components.
    • Charge Your Laptop (if applicable): Ensure your laptop is plugged into power throughout the entire process to avoid interruptions.

    Method 1: Using the Built-in Rollback Feature (Within 10 Days)

    Windows 11 offers a convenient rollback option that allows you to revert to Windows 10 if you upgraded within the past 10 days. This method is the easiest as it preserves your personal files. Windows achieves this by keeping a Windows.old folder on your system drive containing the previous operating system files.

    Important Note: This option will not be available if:

    • More than 10 days have passed since the Windows 11 upgrade.
    • You performed a clean install of Windows 11 instead of an upgrade.
    • You manually deleted the Windows.old folder (e.g., using Disk Cleanup or Storage Sense).
    • You created a new user account after upgrading.

    Step-by-Step Guide:

    1. Open Settings: Click the Start button and select Settings (the gear icon), or press Windows key + I.
    2. Navigate to Recovery Options: In the Settings window, click on “System” in the left-hand menu, then select “Recovery” on the right.
    3. Initiate Go back: Under “Recovery options,” locate the “Go back” button (or “Previous version of Windows” in some builds) and click it.
      • User Insight: I remember upgrading my old laptop to Windows 11 and quickly realizing some legacy software wouldn’t run. The 10-day rollback saved me a lot of hassle. It’s truly a lifesaver if you act fast.
    4. Provide Feedback (Optional): A window titled “Why are you going back?” will appear. Select a reason (or provide more details in the “Tell us more” box) for your downgrade. This feedback helps Microsoft improve future updates. Click “Next.”
    5. Check for Updates (Optional): Windows might suggest checking for updates before rolling back, in case a fix is available for your issue. If you’re determined to downgrade, click “No, thanks.”
    6. Read What You Need to Know: Review the information regarding the rollback process. It will remind you that you might need to reinstall some apps and programs, and you’ll need your old Windows 10 password if you had one. Click “Next.”
    7. Final Confirmation: Read the final warning about keeping your PC plugged in and avoiding interruptions. Click “Go back to Windows 10” (or “Go back to earlier build”).
    8. Wait for the Downgrade: Your computer will restart and begin the rollback process. This can take some time, and your PC may restart multiple times. Do not turn off your computer during this process.
    9. Log In to Windows 10: Once the rollback is complete, your computer will boot directly into Windows 10. You may need to log in with your previous Windows 10 password. Reinstall any applications that were removed.

    Method 2: Performing a Clean Install of Windows 10 (After 10 Days or for a Fresh Start)

    If the 10-day rollback period has passed, or if you want a completely fresh installation of Windows 10 without any remnants of the Windows 11 upgrade, a clean install is your only option. This process will erase everything on your system drive, including all personal files, installed programs, and settings. This is why the backup step is non-negotiable for this method.

    What You’ll Need:

    • A USB flash drive (minimum 8GB capacity).
    • Another working Windows PC (to create the installation media).
    • Windows 10 Media Creation Tool.

    Step-by-Step Guide:

    Part 1: Create Windows 10 Installation Media

    1. Download Media Creation Tool: On a working Windows PC, go to the official Microsoft Windows 10 download page (search for “Download Windows 10” on Microsoft’s website). Under “Create Windows 10 installation media,” click “Download tool now.”
    2. Run the Tool: Once downloaded, run the MediaCreationTool.exe file. Accept the license terms.
    3. Choose “Create installation media”: Select “Create installation media (USB flash drive, DVD, or ISO file) for another PC” and click “Next.”
    4. Select Language, Edition, and Architecture:
      • By default, it will recommend options for the PC you are currently using. You can uncheck “Use the recommended options for this PC” if you need to select different options.
      • Ensure the Edition matches your original Windows 10 license (e.g., Windows 10 Home or Pro). The architecture should usually be 64-bit. Click “Next.”
    5. Choose Media Type: Select “USB flash drive” and click “Next.”
    6. Select USB Drive: Choose your USB flash drive from the list. Ensure it’s the correct drive, as all data on it will be deleted. Click “Next.”
    7. Download and Create: The tool will now download Windows 10 and create the bootable USB drive. This process can take some time depending on your internet speed. Once it’s finished, click “Finish.”

    Part 2: Install Windows 10 on Your PC

    1. Insert USB and Restart: Insert the newly created bootable USB drive into the Windows 11 PC you want to downgrade. Restart the PC.
    2. Boot from USB: You’ll need to enter your computer’s BIOS/UEFI settings or a Boot Menu to tell it to start from the USB drive. The key to press varies by manufacturer (commonly F2, F10, F12, Del, or Esc) and usually appears briefly on screen during startup.
      • Consult your PC’s manual or the manufacturer’s support website if you’re unsure.
      • In the BIOS/UEFI, navigate to the “Boot” tab or “Boot Order” and set the USB drive as the primary boot device. Save changes and exit.
    3. Windows Setup: The PC will boot from the USB drive and load the Windows Setup screen.
      • Select your language, time, and keyboard preferences. Click “Next.”
      • Click “Install now.”
    4. Enter Product Key (Optional):
      • If you’re reinstalling Windows 10 on a PC that previously had an activated digital license for Windows 10, you can usually click “I don’t have a product key.” Windows will automatically activate after installation once connected to the internet.
      • If prompted, ensure you select the same Windows 10 edition (Home or Pro) that your license is for.
    5. Accept License Terms: Check “I accept the license terms” and click “Next.”
    6. Choose Installation Type: Select “Custom: Install Windows only (advanced).” This is crucial for a clean install.
    7. Delete Partitions: You will see a list of drives and partitions. To perform a truly clean install, you should delete all partitions associated with your primary drive (usually Drive 0).
      • Select each partition (e.g., “Drive 0 Partition 1,” “Drive 0 Partition 2,” etc.) and click “Delete.” Confirm any warnings.
      • This will consolidate the drive space into “Drive 0 Unallocated Space.”
    8. Install Windows: Select the “Drive 0 Unallocated Space” and click “Next.” Windows will now begin installing.
    9. Complete Setup: Your PC will restart several times. Follow the on-screen prompts to set up your Windows 10 user account, privacy settings, and other preferences.
    10. Reinstall Drivers and Software: After the installation is complete, install any necessary drivers (especially for graphics, Wi-Fi, and chipset) from your PC manufacturer’s website. Then, reinstall your applications and restore your backed-up data.

    Potential Risks and Challenges of Downgrading

    • Data Loss: As emphasized, the biggest risk is losing your data if you don’t perform a complete backup.
    • Driver Compatibility: Newer hardware designed primarily for Windows 11 might have limited or no Windows 10 drivers, leading to reduced functionality or stability issues.
    • Activation Issues: While rare with digital licenses, some users might encounter activation problems, especially if the Windows 10 license was an upgrade from an older OS.
    • Time Consumption: Both methods, especially a clean install, can be time-consuming, requiring significant effort for backing up, installing, and reconfiguring your system.
    • App Reinstallation: All applications will need to be reinstalled and reconfigured after a clean install.

    Frequently Asked Questions (FAQ)

    Q: How long do I have to downgrade from Windows 11 to Windows 10 using the built-in option?

    You typically have 10 days from the date you upgraded to Windows 11 to use the built-in rollback feature to revert to Windows 10. After this period, the Windows.old folder (which contains the necessary files for rollback) is usually deleted to free up disk space.

    Q: Will I lose my files if I downgrade from Windows 11 to Windows 10?

    If you use the built-in rollback feature within 10 days, your personal files are usually preserved. However, applications installed after the Windows 11 upgrade may need to be reinstalled. If you perform a clean install of Windows 10 (which is necessary after the 10-day window), you will lose all data on your system drive, making a complete data backup absolutely essential.

    Q: Do I need a product key to reinstall Windows 10 after downgrading from Windows 11?

    If your Windows 10 license was a digital license linked to your Microsoft account or embedded in your computer’s firmware (common for pre-built PCs), it should automatically reactivate after a clean installation when your PC connects to the internet. You typically won’t need to enter a product key. However, it’s always a good idea to have it handy if you purchased a retail key.

    Q: My “Go back” option is greyed out. What does that mean?

    If the “Go back” option in Recovery settings is greyed out, it means you can no longer use the built-in rollback feature. This usually happens if more than 10 days have passed since your Windows 11 upgrade, the Windows.old folder was deleted, or a clean install of Windows 11 was performed initially. In this scenario, your only option is to perform a clean install of Windows 10.

    Q: Can I keep my apps when downgrading to Windows 10?

    If you use the built-in rollback feature (within 10 days), some of your core Windows 10 apps and settings should be restored. However, apps installed after the Windows 11 upgrade, or major system changes, might be removed. With a clean install, you will lose all installed applications and will need to reinstall them from scratch.

    Q: How long does the downgrade process take?

    The time required varies. The built-in rollback feature might take anywhere from 30 minutes to a few hours, depending on your system’s speed and the amount of data. A clean install of Windows 10, including creating the installation media, installing the OS, and then reinstalling your applications and restoring data, can take several hours, or even half a day, of dedicated effort.

  • How to Encrypt a Folder in Windows 11

    How to Encrypt a Folder in Windows 11

    In today’s digital world, safeguarding your personal and sensitive information is more crucial than ever. Whether it’s confidential work documents, private photos, or financial records, encrypting a folder in Windows 11 adds a vital layer of security, making your data unreadable to unauthorized users. This guide will walk you through various methods to encrypt folders on your Windows 11 PC, covering both built-in options and powerful third-party solutions.

    What is Encryption? Encryption is the process of converting data into a coded form to prevent unauthorized access. Only individuals with the correct decryption key (often a password or digital certificate) can unlock and read the original information. Think of it like putting your files into a locked safe – without the key, no one can see what’s inside.

    Why Encrypt a Folder?

    • Privacy: Keeps your personal files private, even if someone gains access to your computer.
    • Security: Protects sensitive data from theft or unauthorized viewing, especially if your device is lost or stolen.
    • Compliance: Essential for meeting data protection regulations in many professional environments.

    Method 1: Using Encrypting File System (EFS) – The Built-in Folder Encryption

    Encrypting File System (EFS) is a native Windows feature that allows you to encrypt individual files and folders on NTFS-formatted drives. It’s built right into Windows 11 (though typically available only in Pro, Enterprise, and Education editions). EFS encryption is tied to your Windows user account, meaning only you (when logged into that account) can access the encrypted files.

    Important Considerations for EFS:

    • Edition Specific: EFS is not available in Windows 11 Home edition. If you have Home, you’ll need to consider other methods.
    • User Account Dependent: The encryption is linked to your user profile. If your user profile gets corrupted or deleted, or if you reinstall Windows without backing up your encryption certificate, you could lose access to your files.
    • NTFS Requirement: The folder must be on an NTFS-formatted drive. Most internal Windows drives are already NTFS.

    Step-by-Step Guide to Encrypt a Folder with EFS:

    1. Locate the Folder: Open File Explorer and navigate to the folder you wish to encrypt.
    2. Access Folder Properties:
      • Right-click on the target folder.
      • Select “Properties” from the context menu.
    3. Open Advanced Attributes:
      • In the “Properties” window, ensure you are on the “General” tab.
      • Click the “Advanced…” button at the bottom.
    4. Enable Encryption:
      • In the “Advanced Attributes” window, check the box next to “Encrypt contents to secure data.”
      • Click “OK.”
    5. Apply Changes:
      • Back in the “Properties” window, click “Apply.”
    6. Choose Encryption Scope: A pop-up dialog box titled “Encrypt Folder” will appear. You’ll have two options:
      • “Encrypt the file only”: This encrypts just the folder itself, but not its existing contents or any new files added later. (Generally not recommended for folders.)
      • “Apply changes to this folder, subfolders and files”: This is the most common and recommended choice, as it encrypts all existing files and subfolders, and automatically encrypts any new files you add to this folder in the future. Select this option.
      • Click “OK.”
    7. Backup Your Encryption Key (Crucial Step!):
      • After applying the encryption, a notification might appear in the System Tray (bottom-right corner of your screen) prompting you to back up your encryption certificate. This is a critical step!
      • Click on this notification, or manually go to Control Panel > User Accounts > User Accounts > Manage your file encryption certificates.
      • Follow the prompts to export your encryption certificate and key to a secure location, like a USB drive or a cloud storage service that you trust. You’ll be asked to create a strong password for the backup file.
      • Personal Insight: I cannot stress enough how important this backup is. I’ve seen countless cases where users lost access to their EFS-encrypted files because they didn’t back up the certificate and then reinstalled Windows or experienced a system crash. Don’t skip this!

    Once complete, you’ll notice a small padlock icon on the encrypted folder’s icon in File Explorer. Anyone trying to access this folder from a different user account on the same computer, or if the drive is moved to another computer, will be denied access unless they have your encryption certificate and password.

    Method 2: Using BitLocker to Encrypt a Virtual Drive

    While BitLocker is primarily a full-disk encryption tool for entire drives (and also available only in Windows 11 Pro, Enterprise, and Education editions), you can cleverly use it to encrypt a specific folder by creating a virtual hard disk (VHDX file) and then encrypting that virtual disk with BitLocker. This creates a secure, encrypted container for your files that can be mounted and unmounted.

    Advantages of this method:

    • Stronger Encryption: BitLocker offers robust encryption.
    • Portability: The VHDX file can be moved to other drives or computers.
    • Clear Lock/Unlock: You explicitly “mount” (unlock) and “unmount” (lock) the virtual drive.

    Step-by-Step Guide to Encrypt a Folder with BitLocker via VHDX:

    1. Create a Virtual Hard Disk (VHDX):
      • Type “Disk Management” in the Windows Search bar and open it.
      • In Disk Management, go to Action > Create VHD.
      • Location: Click “Browse” and choose a location on your computer where you want to save the VHDX file. Give it a meaningful name (e.g., MyEncryptedData.vhdx).
      • Virtual hard disk size: Enter the size you want for your encrypted folder (e.g., 5 GB, 10 GB). Ensure it’s large enough for your files.
      • Virtual hard disk format: Choose “VHDX” (recommended for modern systems).
      • Virtual hard disk type: Select “Dynamically expanding” so the file grows as you add data, saving space.
      • Click “OK.”
    2. Initialize the New Disk:
      • After the VHDX is created, it will appear as an “Unknown” or “Not Initialized” disk in Disk Management.
      • Right-click on the “Disk #” (corresponding to your new VHDX) and select “Initialize Disk.”
      • Choose “GPT (GUID Partition Table)” for modern systems and click “OK.”
    3. Create a Simple Volume:
      • The disk will now show as “Unallocated.” Right-click on the unallocated space on your new VHDX and select “New Simple Volume…”
      • Follow the New Simple Volume Wizard:
        • Click “Next.”
        • Leave “Simple volume size in MB” as default (maximum) and click “Next.”
        • Assign a drive letter (e.g., E:, F:). Click “Next.”
        • Format Partition: Choose “Format this volume with the following settings.”
          • File system: Select “NTFS.”
          • Allocation unit size: Leave as “Default.”
          • Volume label: Give it a descriptive name (e.g., “Encrypted Volume”).
          • Check “Perform a quick format.”
        • Click “Next” and then “Finish.”
    4. Turn On BitLocker for the Virtual Drive:
      • Open File Explorer. You will now see your newly created drive (e.g., Encrypted Volume (E:)).
      • Right-click on this new virtual drive.
      • Select “Turn on BitLocker.”
    5. Set Up BitLocker Encryption:
      • Choose how to unlock the drive: Select “Use a password to unlock the drive.”
      • Enter a strong password twice.
      • Save the Recovery Key: You’ll be prompted to save your BitLocker recovery key. This key is vital if you forget your password.
        • Save to a file: Save it to a text file on a USB drive or another secure location (NOT on the same drive you’re encrypting).
        • Print the recovery key: Print a physical copy.
        • Save to your Microsoft account (if applicable): This is convenient but relies on your Microsoft account security.
      • Click “Next.”
    6. Choose Encryption Method:
      • Encrypt used disk space only (faster for new drives and PCs)“: Recommended if the virtual drive is new and empty.
      • Encrypt entire drive (slower but encrypts all space)“: Recommended if you’ve already put files on it or for maximum security.
      • Click “Next.”
    7. Choose Encryption Mode:
      • New encryption mode (XTS-AES)“: Recommended for fixed drives on current Windows versions.
      • Compatible mode (AES-CBC)“: For drives that will be used with older Windows versions.
      • Click “Next.”
    8. Start Encryption: Click “Start encrypting.” The encryption process will begin. This can take time depending on the size of the virtual drive.

    Using your Encrypted Virtual Folder:

    • To access your encrypted folder, simply double-click the VHDX file you created. Windows will prompt you for the BitLocker password.
    • After entering the password, the virtual drive will mount and appear as a regular drive letter in File Explorer. You can then drag and drop files into it.
    • When you are done, right-click on the virtual drive in File Explorer and select “Eject” to unmount and lock it. This hides its contents.

    Method 3: Using Third-Party Encryption Software

    While Windows provides built-in encryption, some users might prefer third-party software for additional features, cross-platform compatibility, or a different user experience. Many of these tools offer simple password protection for folders, stronger encryption algorithms, or the ability to create encrypted containers.

    Popular Third-Party Tools:

    • VeraCrypt: A free, open-source, and highly respected encryption tool. It’s a successor to TrueCrypt and allows you to create encrypted virtual disk volumes, encrypt partitions, or even entire drives. It’s known for its robust security and advanced options.
    • 7-Zip: While primarily a file archiver, 7-Zip can create password-protected .zip or .7z archives with strong AES-256 encryption. You can put all your sensitive files into one of these archives.
      • How to: Select the files/folders, right-click, choose “7-Zip” > “Add to archive…”, set a password under the “Encryption” section, and select “AES-256” as the encryption method. This creates a single encrypted file rather than an encrypted folder that you interact with directly.
    • AxCrypt: A user-friendly encryption software that integrates with File Explorer. It allows you to encrypt individual files and folders with a right-click. It has both free and paid versions with varying features.
    • NordLocker: A cross-platform file encryption tool that offers a simple drag-and-drop interface for creating encrypted “lockers” (folders).

    General Steps for Third-Party Software (Example with VeraCrypt):

    1. Download and Install: Download the installer from the official website and follow the installation instructions.
    2. Create Volume/Locker: Most tools will guide you through creating a new encrypted container or “volume.”
      • For VeraCrypt, you’d typically choose to “Create an encrypted file container.”
    3. Choose Location and Size: Specify where to save the encrypted container file and its maximum size.
    4. Select Encryption Algorithms: Choose the desired encryption algorithm (e.g., AES-256) and hash algorithm.
    5. Set a Strong Password: This is your primary key to access the encrypted data. Choose a long, complex, and unique password. Some tools also allow keyfiles.
    6. Format (if a virtual drive): If creating a virtual drive, you’ll need to format it within the software.
    7. Mount/Unlock: To access your encrypted folder, you’ll “mount” or “unlock” the container using the software and your password. It will then appear as a new drive letter.
    8. Dismount/Lock: When finished, “dismount” or “lock” the container to secure your files again.

    Best Practices for Folder Encryption

    • Strong Passwords/Passphrases: Use complex, unique passwords or passphrases that are difficult to guess.
    • Backup Encryption Keys/Certificates: This is paramount! Losing your EFS certificate or BitLocker recovery key means permanently losing access to your encrypted data. Store backups in multiple secure, separate locations (e.g., an encrypted USB drive, a secure cloud service, a physical printout in a safe).
    • Regular Backups of Encrypted Data: Even encrypted data can be lost due to hardware failure. Always back up your encrypted files (the encrypted versions) to another drive or cloud storage.
    • Keep Software Updated: Ensure your Windows 11 operating system and any third-party encryption software are always up to date to benefit from the latest security patches.
    • Understand Limitations:
      • EFS: Files lose encryption if moved to a non-NTFS drive. Encryption is tied to your user account.
      • BitLocker (VHDX): The VHDX file itself is visible, though its contents are encrypted.
    • User Account Security: If your Windows user account (with EFS encryption) is compromised, the encryption won’t protect your files from someone logged in as you. Always use a strong password for your Windows account and enable two-factor authentication if possible.

    Frequently Asked Questions (FAQ)

    Q: Can I encrypt a folder in Windows 11 Home Edition?

    Windows 11 Home Edition does not include the built-in Encrypting File System (EFS) or BitLocker for individual folders or drives. To encrypt a folder in Windows 11 Home, you will need to use third-party software like VeraCrypt, 7-Zip (for password-protected archives), or a dedicated folder encryption app.

    Q: What happens if I forget my EFS encryption certificate password?

    If you forget the password for your EFS encryption certificate backup, and you haven’t saved it elsewhere, you will lose access to your encrypted files if your user profile becomes corrupted, you reinstall Windows, or the drive is moved to another computer. This is why backing up the certificate with a strong, memorable password in a safe place is critical.

    Q: How do I know if a folder is encrypted using EFS?

    When a folder or file is encrypted with EFS, you will see a small padlock icon overlaid on its icon in File Explorer. You can also right-click the folder, go to “Properties,” then “Advanced,” and see if “Encrypt contents to secure data” is checked.

    Q: Can another user on my computer access my EFS-encrypted folder?

    No, typically not. EFS encryption is tied to your specific Windows user account. Other users on the same computer, even with administrator privileges, will not be able to open or read the contents of your EFS-encrypted folder unless you have explicitly added their user account to the encryption permissions (an advanced option).

    Q: Is BitLocker better than EFS for folder encryption?

    BitLocker is generally considered more robust as a full-disk encryption solution. While EFS encrypts individual files/folders, BitLocker encrypts entire drives or partitions. Using BitLocker to encrypt a virtual hard disk (VHDX) offers a strong, portable encrypted container for a folder’s contents, providing a higher level of security than EFS, especially against offline attacks.

    Q: If I move an EFS-encrypted file to a USB drive, will it remain encrypted?

    No. EFS encryption is specifically designed for NTFS-formatted drives. If you copy an EFS-encrypted file to a USB drive formatted with FAT32 or exFAT, or to a network share that doesn’t support EFS, the file will be automatically decrypted during the transfer. To maintain encryption, the destination drive must also be NTFS and support EFS.

    Q: How do I decrypt a folder encrypted with EFS?

    To decrypt a folder encrypted with EFS, simply right-click the folder, go to “Properties,” click “Advanced,” uncheck the “Encrypt contents to secure data” box, and click “OK” then “Apply.” If prompted, choose to apply the changes to the folder, subfolders, and files.

  • How to Use Nearby Share on Samsung phone

    How to Use Nearby Share on Samsung phone

    Sharing files between Android devices used to involve a tangle of cables, slow Bluetooth transfers, or cumbersome cloud uploads. Enter Nearby Share, a powerful feature developed by Google that simplifies peer-to-peer file sharing between Android devices, Chromebooks, and even Windows PCs (via a dedicated app). If you own a Samsung phone, you have access to this seamless sharing utility, allowing you to quickly transfer photos, videos, documents, links, and more with nearby compatible devices.

    This comprehensive guide will walk you through everything you need to know about using Nearby Share on your Samsung Galaxy device, from setting it up to troubleshooting common issues.

    What is Nearby Share?

    Nearby Share is a proprietary feature by Google that enables fast and secure file sharing between devices in close proximity. It utilizes a combination of Bluetooth, Bluetooth Low Energy (BLE), Wi-Fi Direct, and Ultra-Wideband (UWB) technology to discover nearby devices and facilitate high-speed transfers. This multi-protocol approach ensures that it can adapt to different scenarios, prioritizing speed and reliability.

    Historical Context: Prior to Nearby Share’s rollout in August 2020, Android lacked a universal, built-in file-sharing solution comparable to Apple’s AirDrop. While manufacturers like Samsung offered their own solutions (like Quick Share), Nearby Share aimed to standardize this functionality across the broader Android ecosystem, making it a truly cross-device sharing standard within the Android realm.

    Nearby Share vs. Quick Share on Samsung Phones

    For Samsung Galaxy users, you might also be familiar with Quick Share. Historically, Quick Share was Samsung’s own fast-sharing technology, offering similar functionality to Nearby Share but primarily optimized for Samsung devices.

    Recent Development: As of January 2024, Google’s Nearby Share and Samsung’s Quick Share have officially merged into a unified experience under the Quick Share brand. This means that if your Samsung phone is updated, the “Nearby Share” option in the share sheet might now appear as “Quick Share,” but it still leverages the underlying Nearby Share technology for cross-device compatibility with non-Samsung Android phones and other compatible devices. For the purpose of this guide, when we refer to “Nearby Share,” we are encompassing this unified Quick Share experience on your Samsung phone.

    Setting Up Nearby Share on Your Samsung Phone

    Before you can send or receive files, you need to ensure Nearby Share (now integrated into Quick Share on newer Samsung devices) is configured correctly.

    Step 1: Ensure Prerequisites are Met

    • Android Version: Your Samsung phone must be running Android 6.0 (Marshmallow) or later. Most modern Samsung phones easily meet this requirement.
    • Google Play Services: Ensure Google Play Services are up-to-date. This happens automatically in the background, but good to note.
    • Bluetooth & Location: Both Bluetooth and Location services must be enabled on both the sending and receiving devices. Nearby Share uses these to discover devices.
    • Wi-Fi: While not strictly required for discovery, Wi-Fi (or Wi-Fi Direct) is crucial for fast data transfer. Both devices should ideally have Wi-Fi turned on.
    • Screen On & Unlocked: For successful discovery and transfer, both the sending and receiving devices should have their screens on and be unlocked.

    Step 2: Configure Your Nearby Share Visibility

    You can control who can see your device for sharing.

    1. Open Settings: On your Samsung phone, swipe down from the top of the screen to open the Quick Settings panel, then tap on the gear icon (Settings).
    2. Navigate to Connected Devices (or Google):
      • On newer One UI versions (e.g., One UI 6.0+): Go to Connected devices. Then tap on Quick Share.
      • On older One UI versions: Scroll down and tap on Google. Then tap on Devices & sharing. Then tap on Nearby Share.
    3. Adjust Visibility:
      • Look for an option like “Who can share with you” or “Device visibility”. Tap on it.
      • You’ll typically see these options:
        • Everyone: Your device will be visible to all nearby Android devices, even those not in your contacts. This is convenient for quick sharing but less private.
        • Contacts: Your device will only be visible to people in your Google Contacts who are also nearby. This is a good balance of convenience and privacy.
        • Your devices: Your device will only be visible to your other devices signed into the same Google account. This is the most private option.
        • Hidden: Your device will not be visible to anyone for Nearby Share. You’ll need to manually enable visibility when you want to receive.
      • Select your preferred visibility. For common use, “Contacts” is often a good default. If you frequently share with new people, “Everyone” might be more practical but remember to switch it back later if privacy is a concern.

    How to Send Files Using Nearby Share on Your Samsung Phone

    Sending content via Nearby Share is straightforward and works for almost any file type.

    1. Open the Content: Go to the app where the content you want to share is located (e.g., Gallery for photos, My Files for documents, Chrome for web links).
    2. Select the Content:
      • For a single item: Tap on the item to open it.
      • For multiple items: Long-press on one item, then tap on other items to select them.
    3. Tap the Share Icon: Look for the standard Share icon (often three dots connected by lines, or an arrow pointing right).
    4. Choose Nearby Share (or Quick Share): In the share sheet that appears, tap on Nearby Share (or Quick Share on newer Samsung devices, which is now the unified service).
    5. Scan for Devices: Your phone will start scanning for nearby compatible devices. Ensure the receiving device also has Bluetooth, Location, and Nearby Share/Quick Share enabled and is visible.
    6. Select the Recipient: Once the receiving device appears in the list, tap on its name.
    7. Receiving Device Accepts: The receiving device will get a notification asking them to Accept or Decline the transfer. They must tap Accept for the transfer to begin.
    8. Transfer Completion: Once accepted, the files will transfer quickly. You’ll see a “Sent” confirmation on your screen, and the recipient will see a “Received” notification.

    Pro Tip: For large files, Nearby Share intelligently switches to Wi-Fi Direct after the initial Bluetooth handshake, providing significantly faster transfer speeds. My personal experience transferring gigabytes of video between phones has been impressively fast thanks to this.

    How to Receive Files Using Nearby Share on Your Samsung Phone

    Receiving files is just as simple, provided your visibility settings are configured.

    1. Ensure Visibility: Make sure your Nearby Share (or Quick Share) visibility is set to “Everyone,” “Contacts,” or “Your devices,” depending on who is sending you the file. (See “Configure Your Nearby Share Visibility” above).
    2. Have Screen On & Unlocked: Your Samsung phone’s screen should be on and unlocked for the device to be discoverable.
    3. Receive Notification: When someone tries to send you a file via Nearby Share, a pop-up notification will appear at the bottom of your screen showing the sender’s device and the content being sent.
    4. Accept or Decline: Tap Accept to receive the file(s) or Decline to reject the transfer.
    5. File Location: Once accepted, the files will be saved to your phone’s storage.
      • Photos and videos typically go to your Gallery app.
      • Documents usually go to your Downloads folder or can be accessed via the My Files app.
      • Links will open directly in your web browser.

    Troubleshooting Common Nearby Share Issues

    While Nearby Share is generally reliable, you might encounter occasional hiccups. Here are common issues and their solutions:

    • Device Not Showing Up:
      • Check Visibility: Ensure both devices have Nearby Share/Quick Share visibility enabled (not “Hidden”) and are set to an appropriate option (“Everyone,” “Contacts,” etc.).
      • Bluetooth & Location: Double-check that Bluetooth and Location services are enabled on both devices.
      • Screen On/Unlocked: Ensure both devices have their screens on and are unlocked.
      • Proximity: Make sure the devices are close to each other (within a few feet).
      • Airplane Mode: Ensure neither device is in Airplane Mode, as this disables necessary radios.
      • Restart Nearby Share: Try turning Nearby Share/Quick Share off and on again in settings.
      • Restart Devices: A simple reboot can often resolve connectivity glitches.
    • Transfer Fails/Slow:
      • Wi-Fi On: Ensure Wi-Fi is enabled on both devices for faster transfer speeds (even if not connected to a network, Wi-Fi Direct can be used).
      • Interference: Move away from sources of strong wireless interference.
      • Battery Saver: Disable any extreme battery saver modes, as they might restrict background activity and wireless functions.
      • Clear Cache (Google Play Services): Go to Settings > Apps > Google Play Services > Storage > Clear cache. This can sometimes resolve underlying issues.
    • Large Files: For very large files, ensure you have sufficient storage space on the receiving device.

    The Future of Nearby Share (Quick Share)

    With the merger of Nearby Share and Quick Share, the future looks bright for seamless cross-device file sharing within the Android ecosystem. This unified approach simplifies the user experience, ensuring that Samsung Galaxy users can effortlessly share content with virtually any modern Android phone, Chromebook, or Windows PC. This integration is a significant step towards a more cohesive and user-friendly Android experience.

    Conclusion

    Nearby Share, now integrated and branded as Quick Share on Samsung Galaxy devices, is an indispensable tool for fast and efficient file sharing. By understanding its settings and capabilities, you can unlock a new level of convenience for transferring photos, videos, documents, and more between your phone and other compatible devices. Say goodbye to the hassle of email attachments or cloud uploads for quick local transfers – Nearby Share (Quick Share) makes it truly effortless.

    FAQ

    Q1: What is the difference between Nearby Share and Quick Share on a Samsung phone?

    Historically, Nearby Share was Google’s standard for Android devices, and Quick Share was Samsung’s proprietary sharing tool. As of January 2024, they have merged. When you use “Quick Share” on a newer Samsung phone, it now includes the underlying Nearby Share technology, meaning it can share seamlessly with non-Samsung Android devices, Chromebooks, and Windows PCs, in addition to other Samsung devices.

    Q2: Do both devices need to have Nearby Share enabled to transfer files?

    Yes, for a successful transfer, both the sending and receiving devices must have Nearby Share (or the unified Quick Share on Samsung phones) enabled, with Bluetooth and Location services turned on. The receiving device’s visibility settings also need to be configured so that the sender can detect it.

    Q3: Why is my Samsung phone not showing up when someone tries to send me files via Nearby Share?

    Several reasons:

    • Your Nearby Share/Quick Share visibility might be set to “Hidden” or a restrictive option like “Your devices only.” Adjust it in Settings to “Contacts” or “Everyone.”
    • Your Bluetooth or Location services might be off.
    • Your phone’s screen might be off or locked.
    • The sender’s device might be too far away.
    • A temporary glitch – try restarting Nearby Share or your phone.

    Q4: Does Nearby Share use mobile data for transferring files?

    No, Nearby Share primarily uses Bluetooth for initial discovery and then Wi-Fi Direct (or UWB if available) for the actual high-speed file transfer. It does not consume your mobile data plan for the transfer itself. It only requires a working internet connection on both devices to enable Google Play Services functionality, but the transfer happens locally.

    Q5: Can I use Nearby Share to send files to an iPhone?

    No, Nearby Share is an Android-centric feature developed by Google and is not natively compatible with iPhones or other Apple devices. Apple uses its own proprietary sharing system called AirDrop. To share files between an Android phone and an iPhone, you would typically need to use cloud services (like Google Drive, Dropbox), messaging apps (WhatsApp), or email.

    Q6: Can I send files to my Windows PC using Nearby Share?

    Yes, you can. Google has released an official Nearby Share app for Windows. If you install this app on your Windows PC and sign in with your Google account, you can send and receive files between your Samsung Galaxy phone and your PC using Nearby Share.